Processing Flight Radar (ADS-B) Data with Imply, Decodable, and Confluent Cloud
Flight radar data are sent by most commercial and private aircraft, and can easily be received and decoded using a Raspberry Pi and a DVB-T receiver stick.
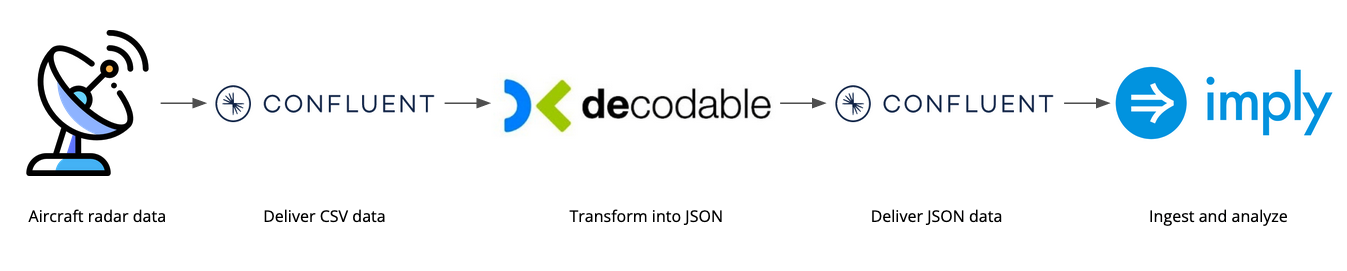
In this tutorial, I am going to show you how to set up a pipeline that
- generates an event stream from flight radar data
- converts this stream into JSON format using Decodable
- and ingests these JSON events into Imply Polaris using the new Pull Ingestion feature that was released in August 2022.
There are simpler methods to get these data into Polaris, but the example serves well to illustrate some of the concepts behind streaming ETL.
Technologies Used
Imply’s analytical platform, based on Apache Druid, is a great tool for fast event analytics, and with the advent of Imply Polaris as a managed service these capabilities are ever easier to use.
Imply will be the final destination of the data pipeline and the visualization tool to the end user.
In order to prepare streaming data for ingestion by Druid, Apache Flink has become a popular programming framework. Decodable is a no-code streaming ETL service on top of Flink that allows data engineers to configure stream processing pipelines using a graphical interface. Instead of programming the entire pipeline in Java, Decodable has a concept of simple building blocks:
- Connections are the interface to external data sources and sinks, such as streaming platforms or databases. They connect to streams.
- Pipelines are processing blocks: their inputs and outputs are streams. A pipeline has a piece of SQL that defines the processing.
- Streams connect pipelines to connections or to other pipelines. A stream has a schema defining the fields and their types.
If you build a processing pipeline using these blocks, Decodable compiles them into Flink code behind the scenes. I am going to use Decodable to do some parsing and preprocessing on the data.
Confluent Cloud is Confluent’s managed streaming service based on Apache Kafka. This will supply the streams (topics) that tie everything together.
Generating Data
Flightradar24 has step by step instructions how to set up a flight radar receiver. There are also various open source repositories that add functionality to the original dump1090 software.
dump1090 makes the data it receives available in a CSV format on port 30003, which is where we are going to pick it up for the next step.
This tutorial assumes that you have your Raspberry Pi set up to receive aircraft data.
Sending Data to Kafka
I am using Confluent Cloud and kcat as a client. (The package that comes with the current release of Raspberry Pi OS, which is based on Debian 11, uses the old name kafkacat.)
In Confluent Cloud, create two topics adsb-raw and adsb-json for the flight data. You can create them with just one partition and leave all the other default settings in place. Also you have to create an API key and assign ACLs to it that allow both read and write access to those two topics. I have covered this in detail in an earlier post.
If you are using a service account rather than personal account for the API key (as you should), you will also need an ACL to allow read access to all consumer groups prefixed by kafka_supervisor.
On your Raspberry Pi, create a script send_kafka.sh like this:
#!/bin/bash

CC_BOOTSTRAP="<confluent cloud bootstrap server>"
CC_APIKEY="<api key>"
CC_SECRET="<secret>"
CC_SECURE="-X security.protocol=SASL_SSL -X sasl.mechanism=PLAIN -X sasl.username=${CC_APIKEY} -X sasl.password=${CC_SECRET}"
TOPIC_NAME="adsb-raw"

nc localhost 30003 \
    | awk -F "," '{ print $5 "|" $0 }' \
    | kafkacat -P -t ${TOPIC_NAME} -b ${CC_BOOTSTRAP} -K "|" ${CC_SECURE}
(The awk command in the script is not strictly needed for this tutorial. It adds the ID of the flight as a key field to each Kafka message.)
Don’t forget to make the file executable with chmod 755 send_kafka.sh. Let’s install this script as a service with systemd, so that it can be started automatically on boot.
Create a file dump1090-kafka.service with this content (you may need to adapt the file path):
[Unit]
Description=connector

[Service]
User=pi
ExecStart=/home/pi/plt-airt-2000/send_kafka.sh
RestartSec=30
Restart=always

[Install]
WantedBy=multi-user.target
and copy it to /etc/systemd/system/. Then run
sudo systemctl enable dump1090-kafka
sudo systemctl start dump1090-kafka
Preprocessing the Data in Decodable
Sign up for a free account at Decodable. Here’s what we need to create:
- a source connector to connect to the raw data topic
- a pipeline to transform the data
- a sink connector to write the transformed data out to Kafka
- streams to connect all these.
Connecting to the data source
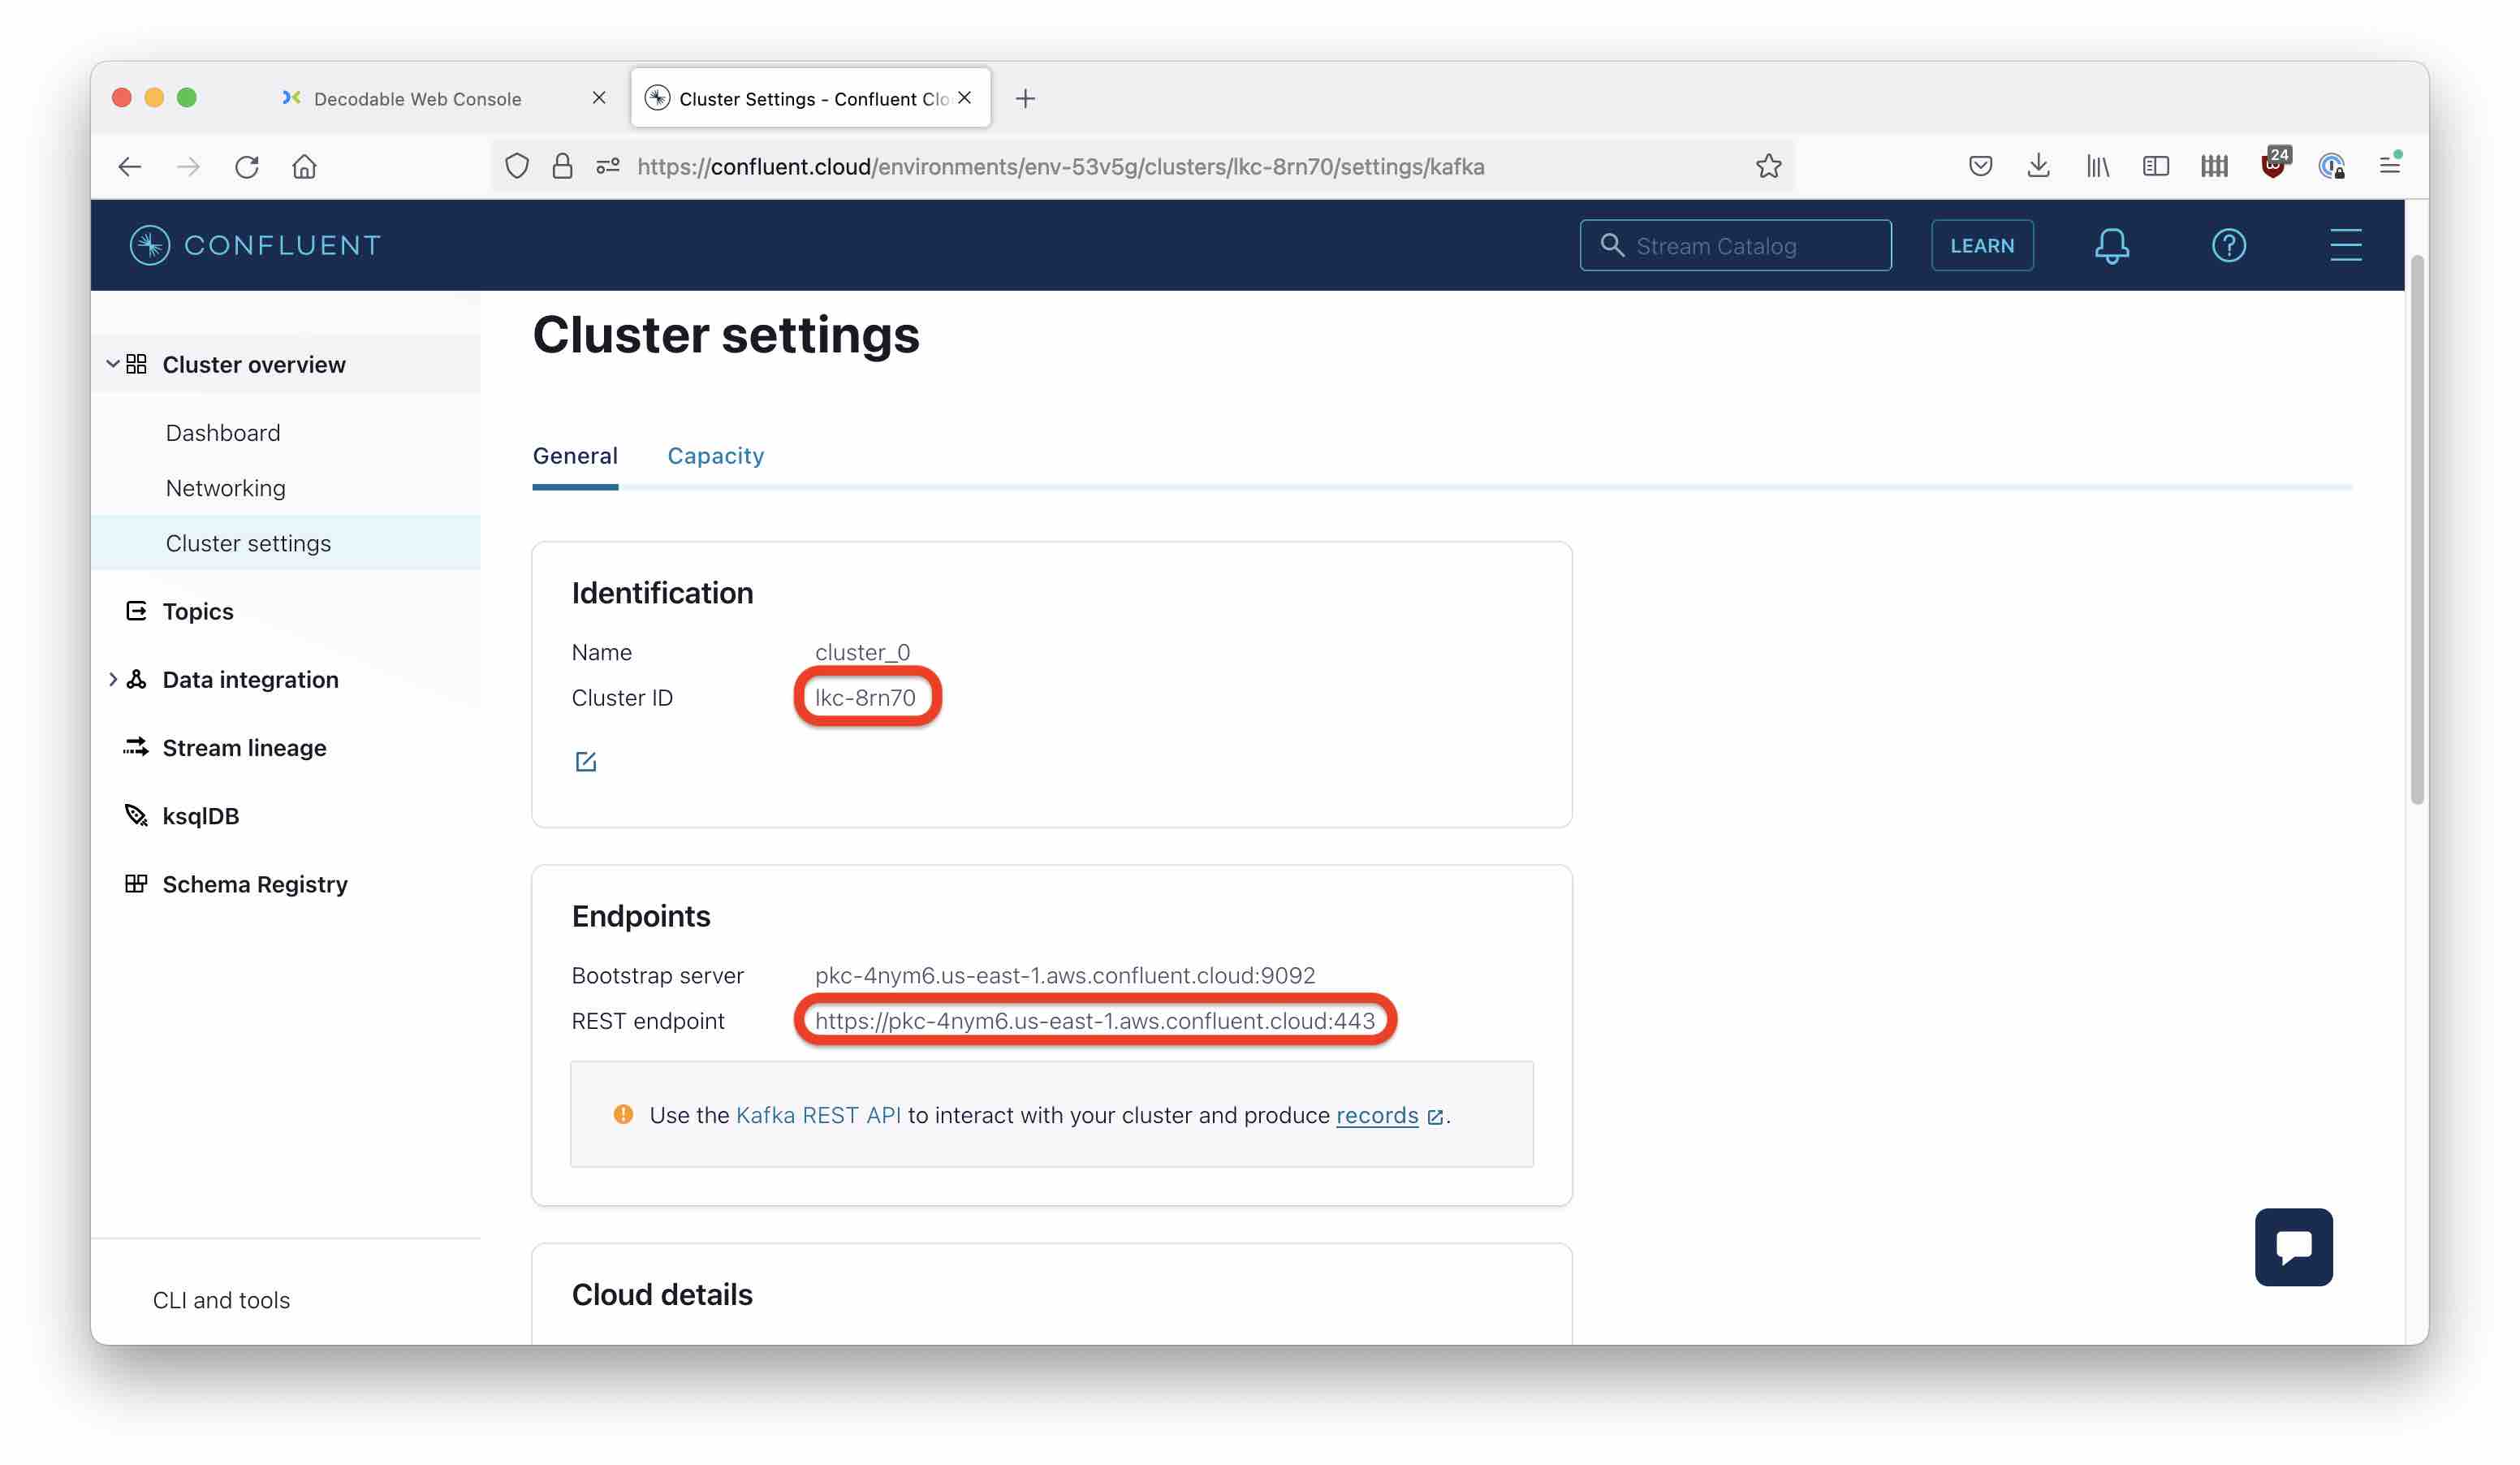
First, create a source connector. You will be needing the Confluent cluster ID and REST endpoint (this is not the broker endpoint!) You can find these in the cluster menu under Cluster overview > Cluster settings.
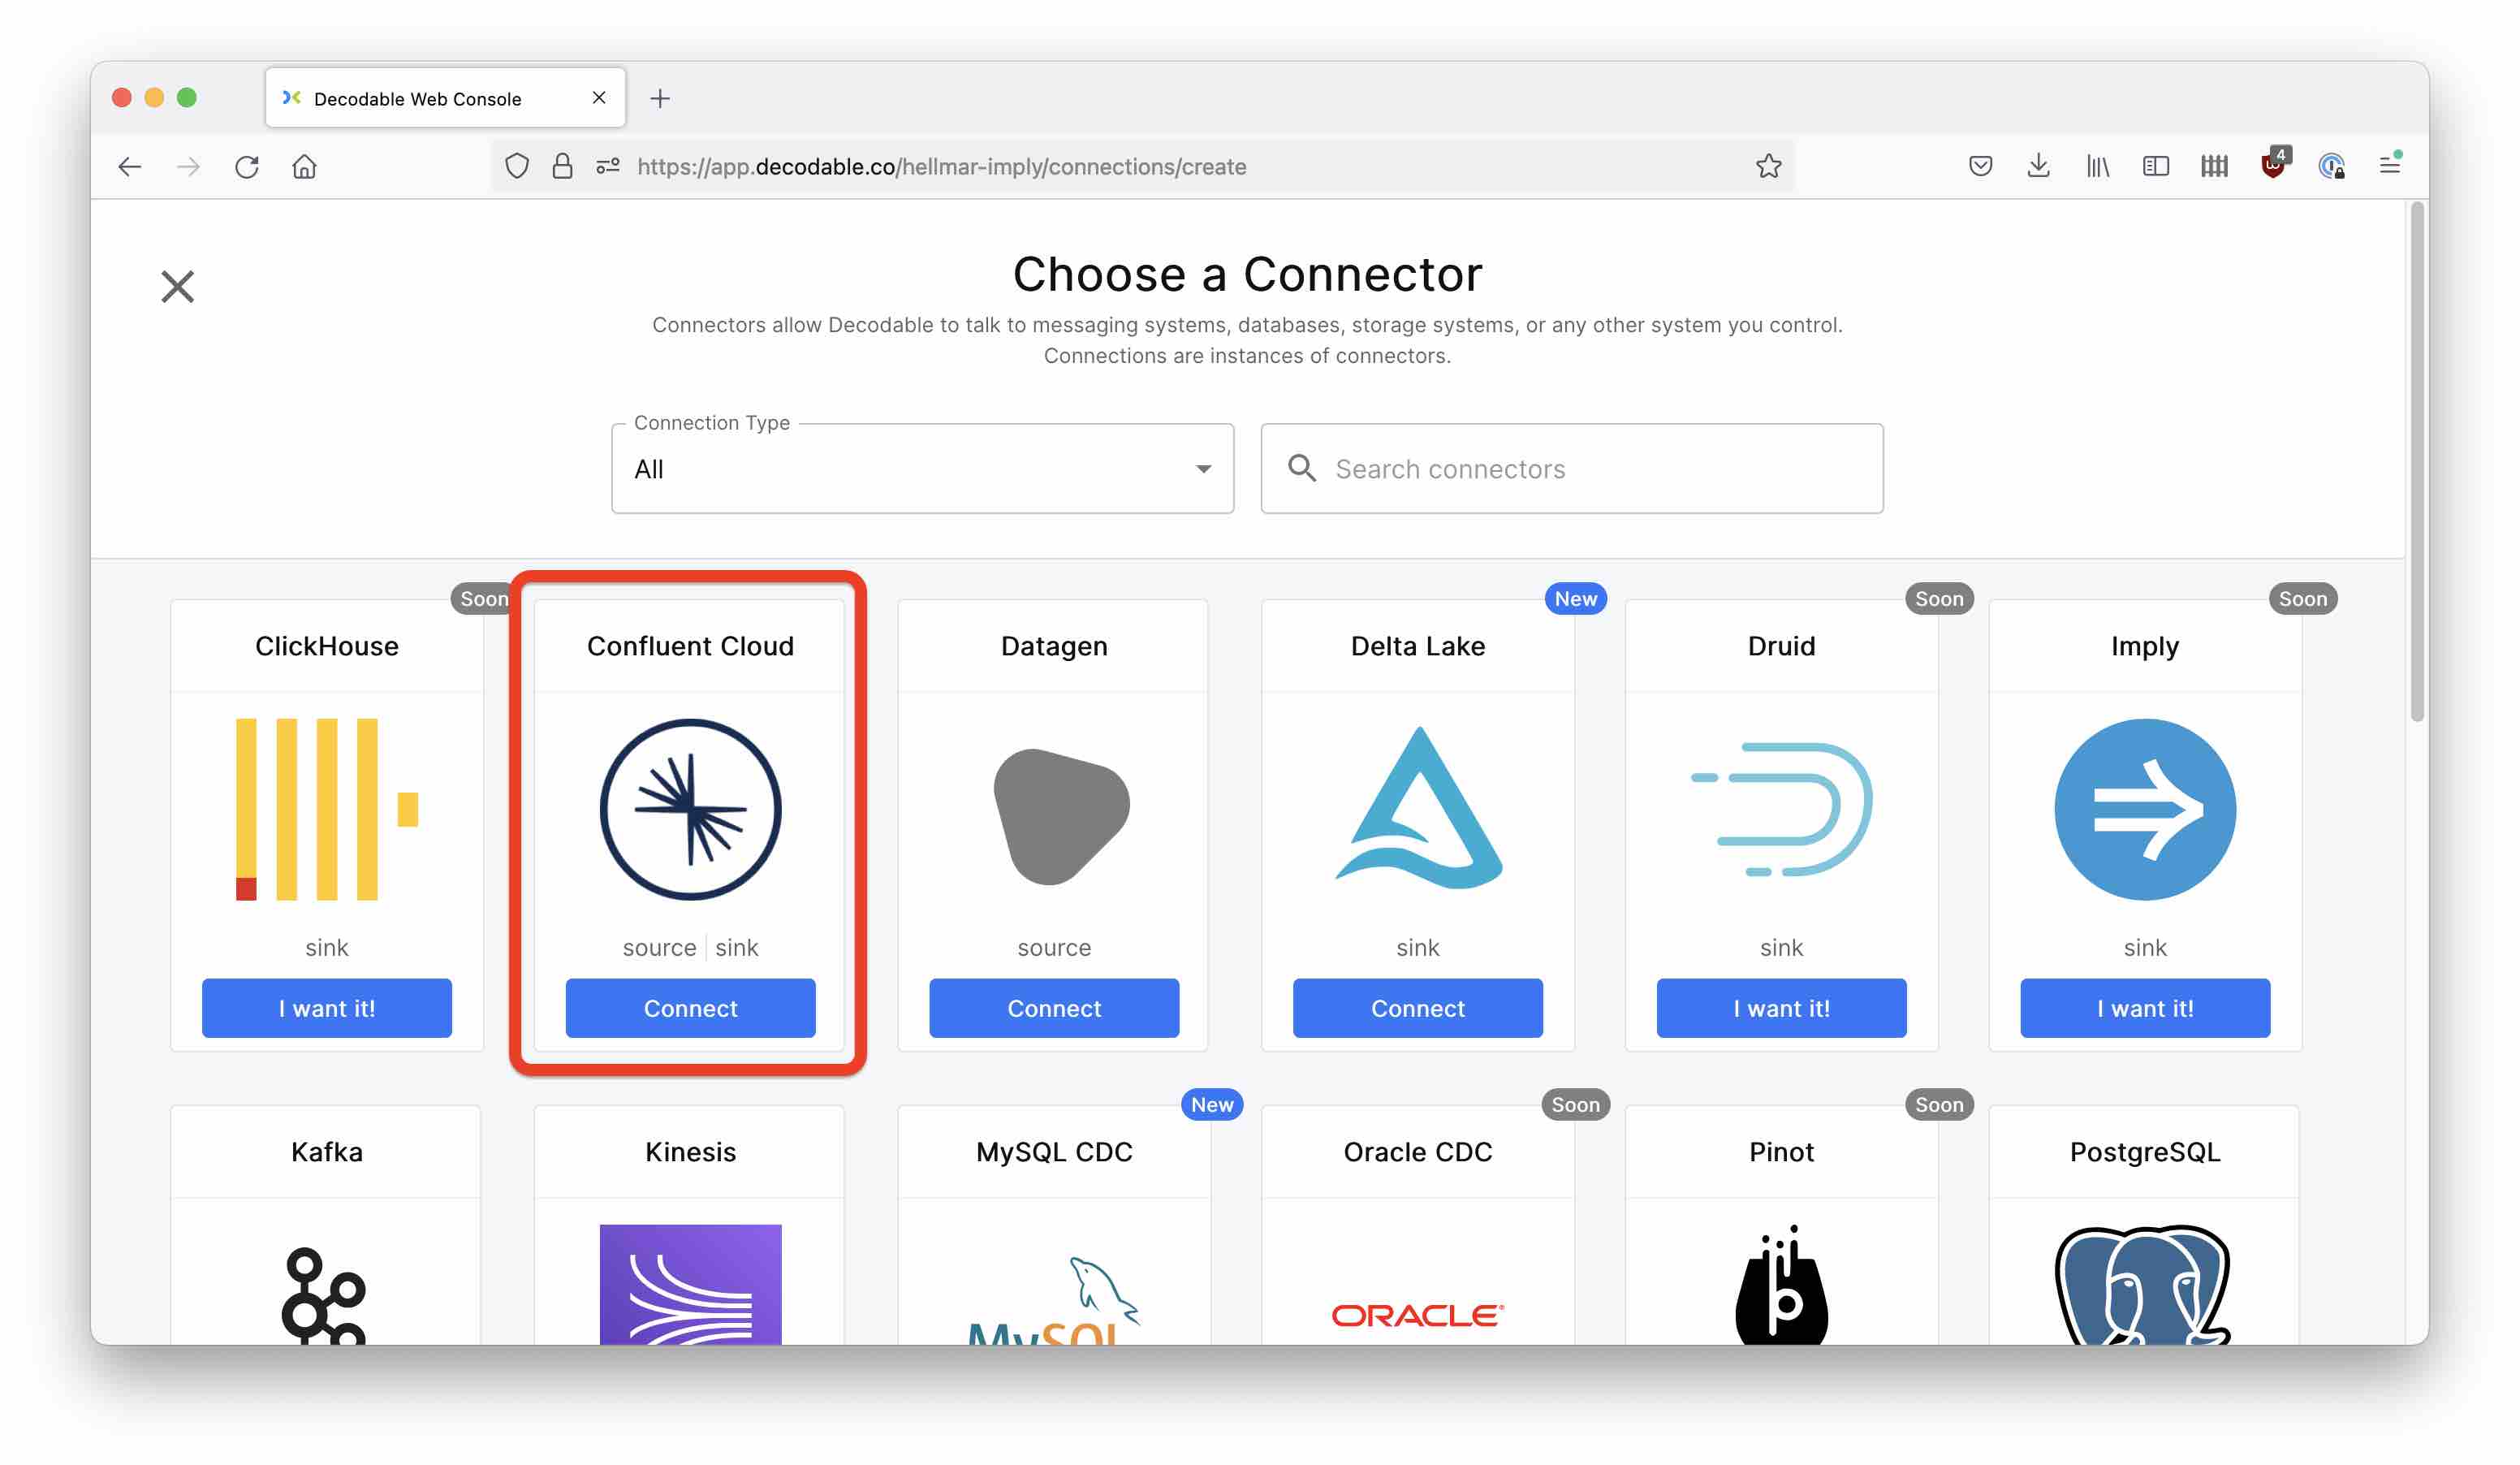
Go to Create Connection in Decodable, and pick Confluent Cloud as the source:
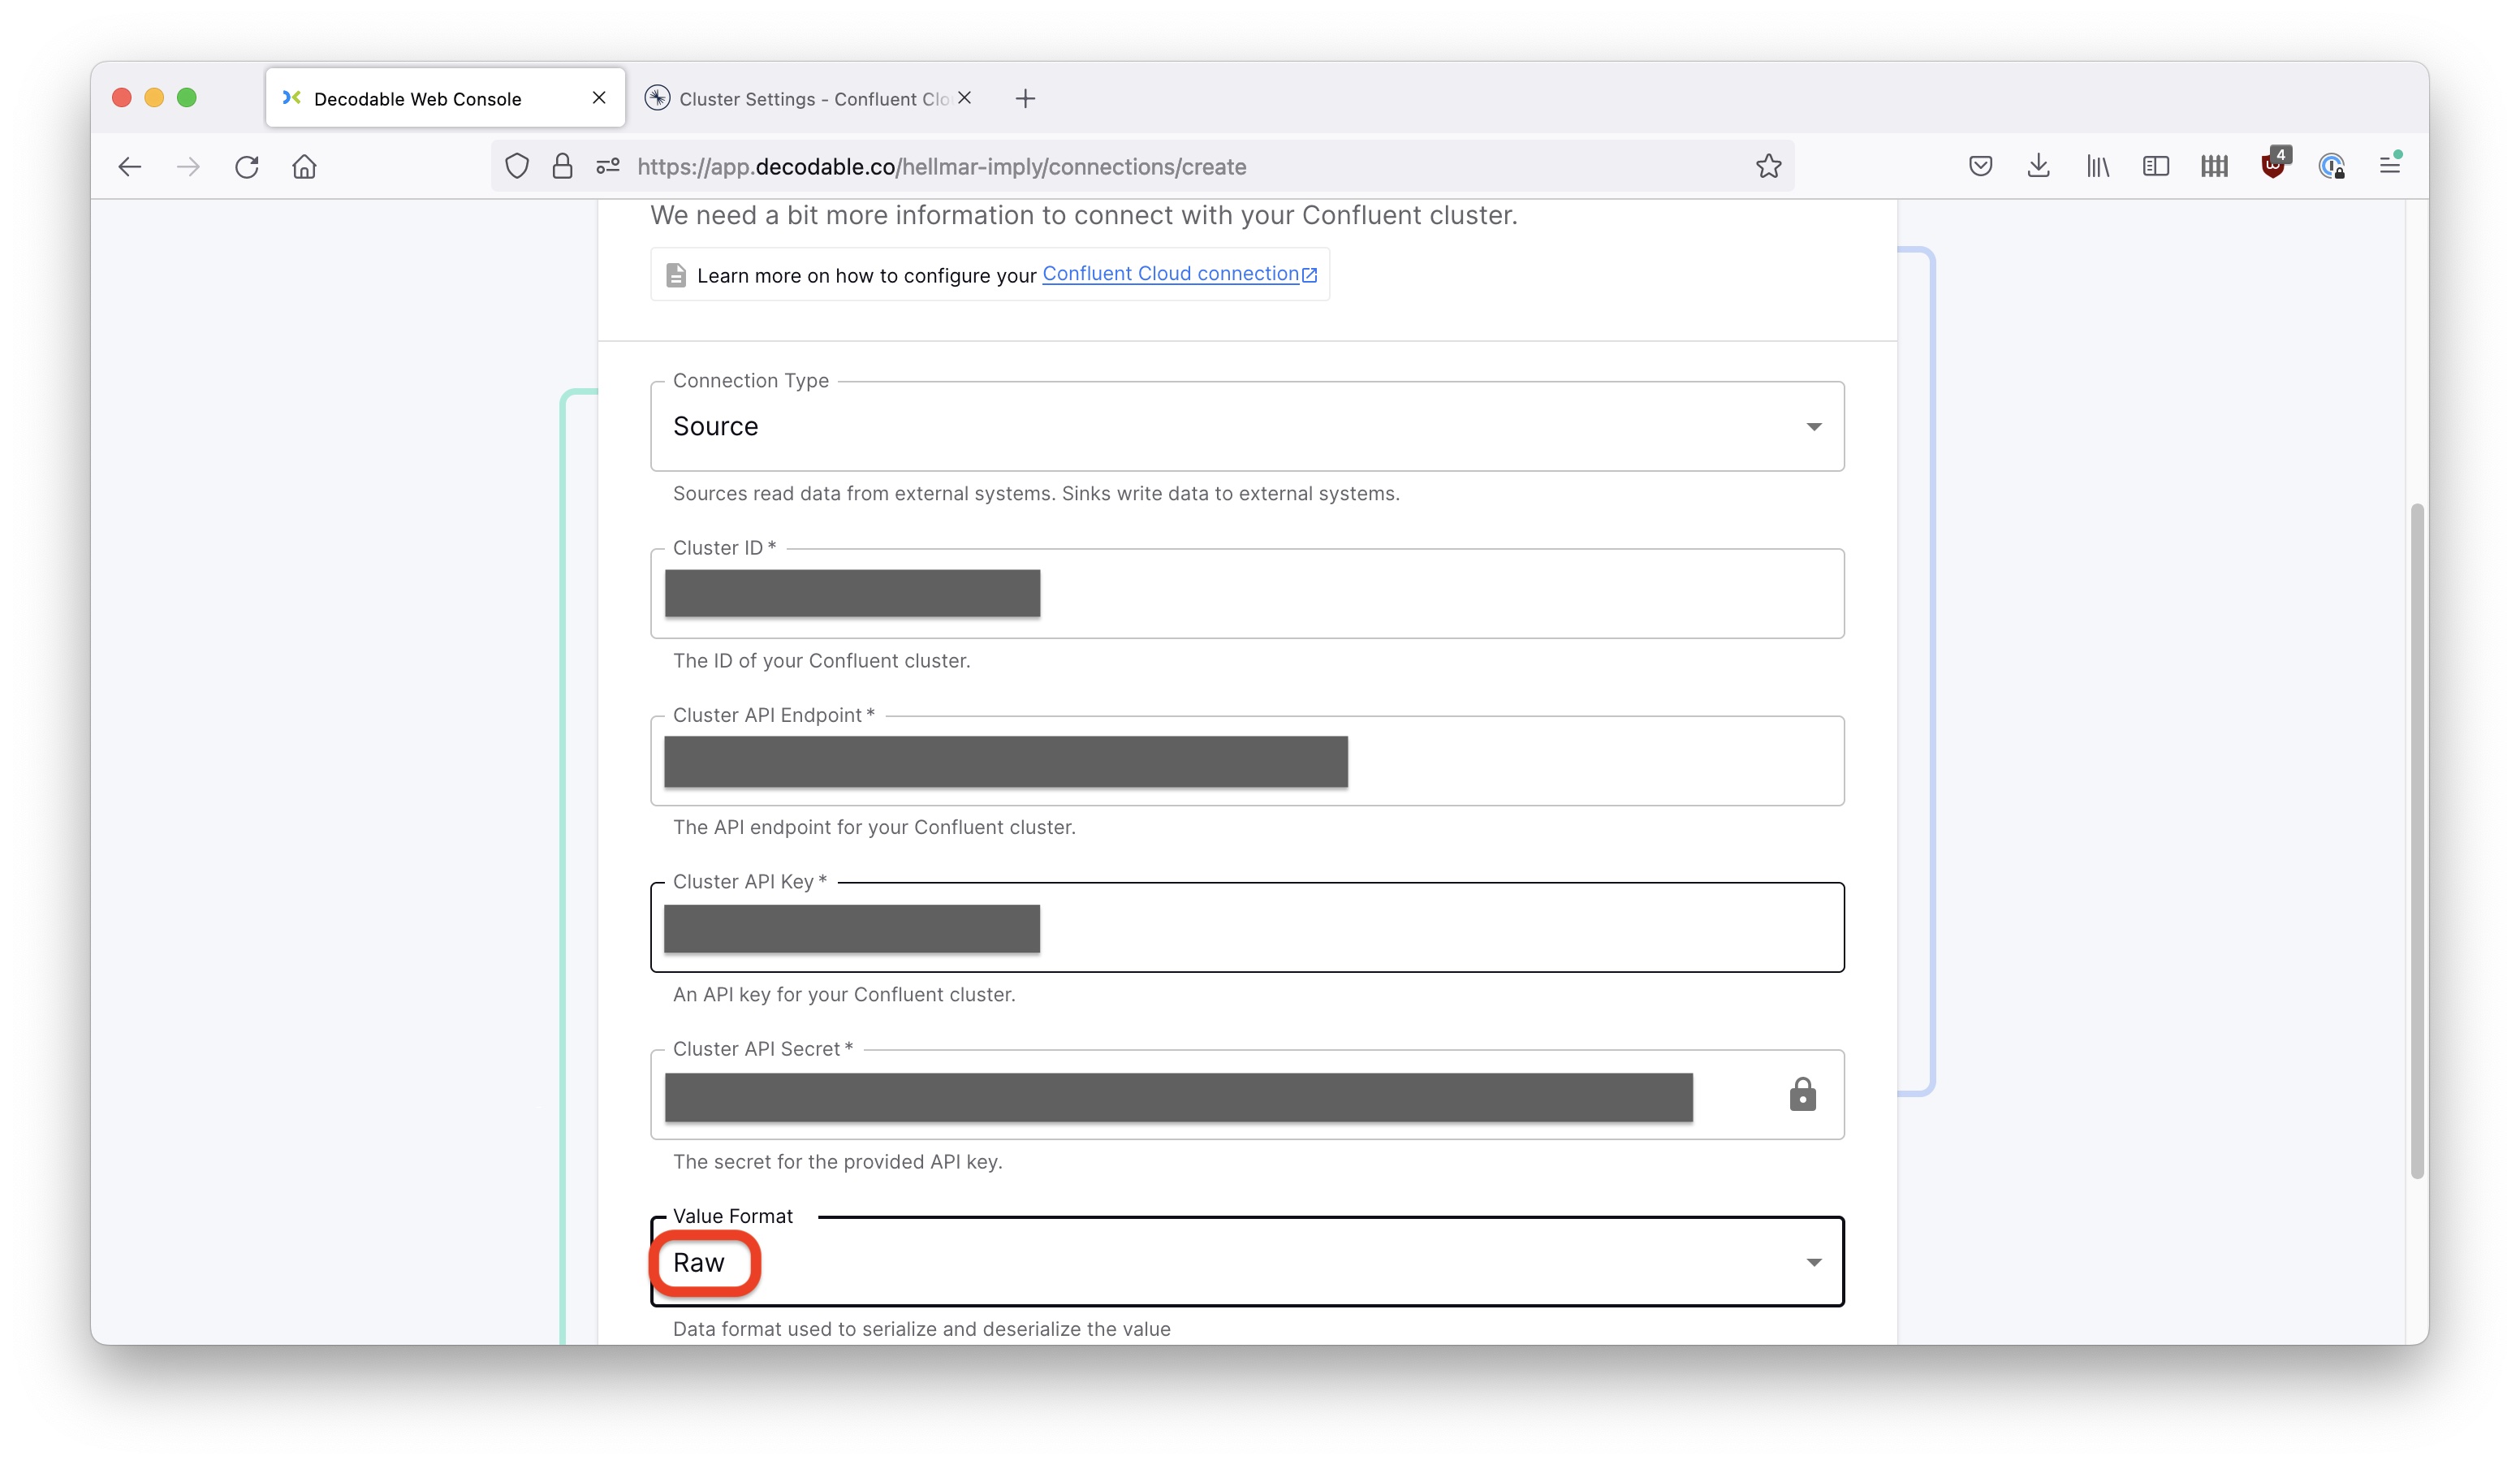
In the next dialog, enter the Confluent cluster settings in Decodable’s configuration dialog. Also enter your API key and secret to access Confluent Cloud, and make sure you select Raw as the value format. Connection Type should be Source.
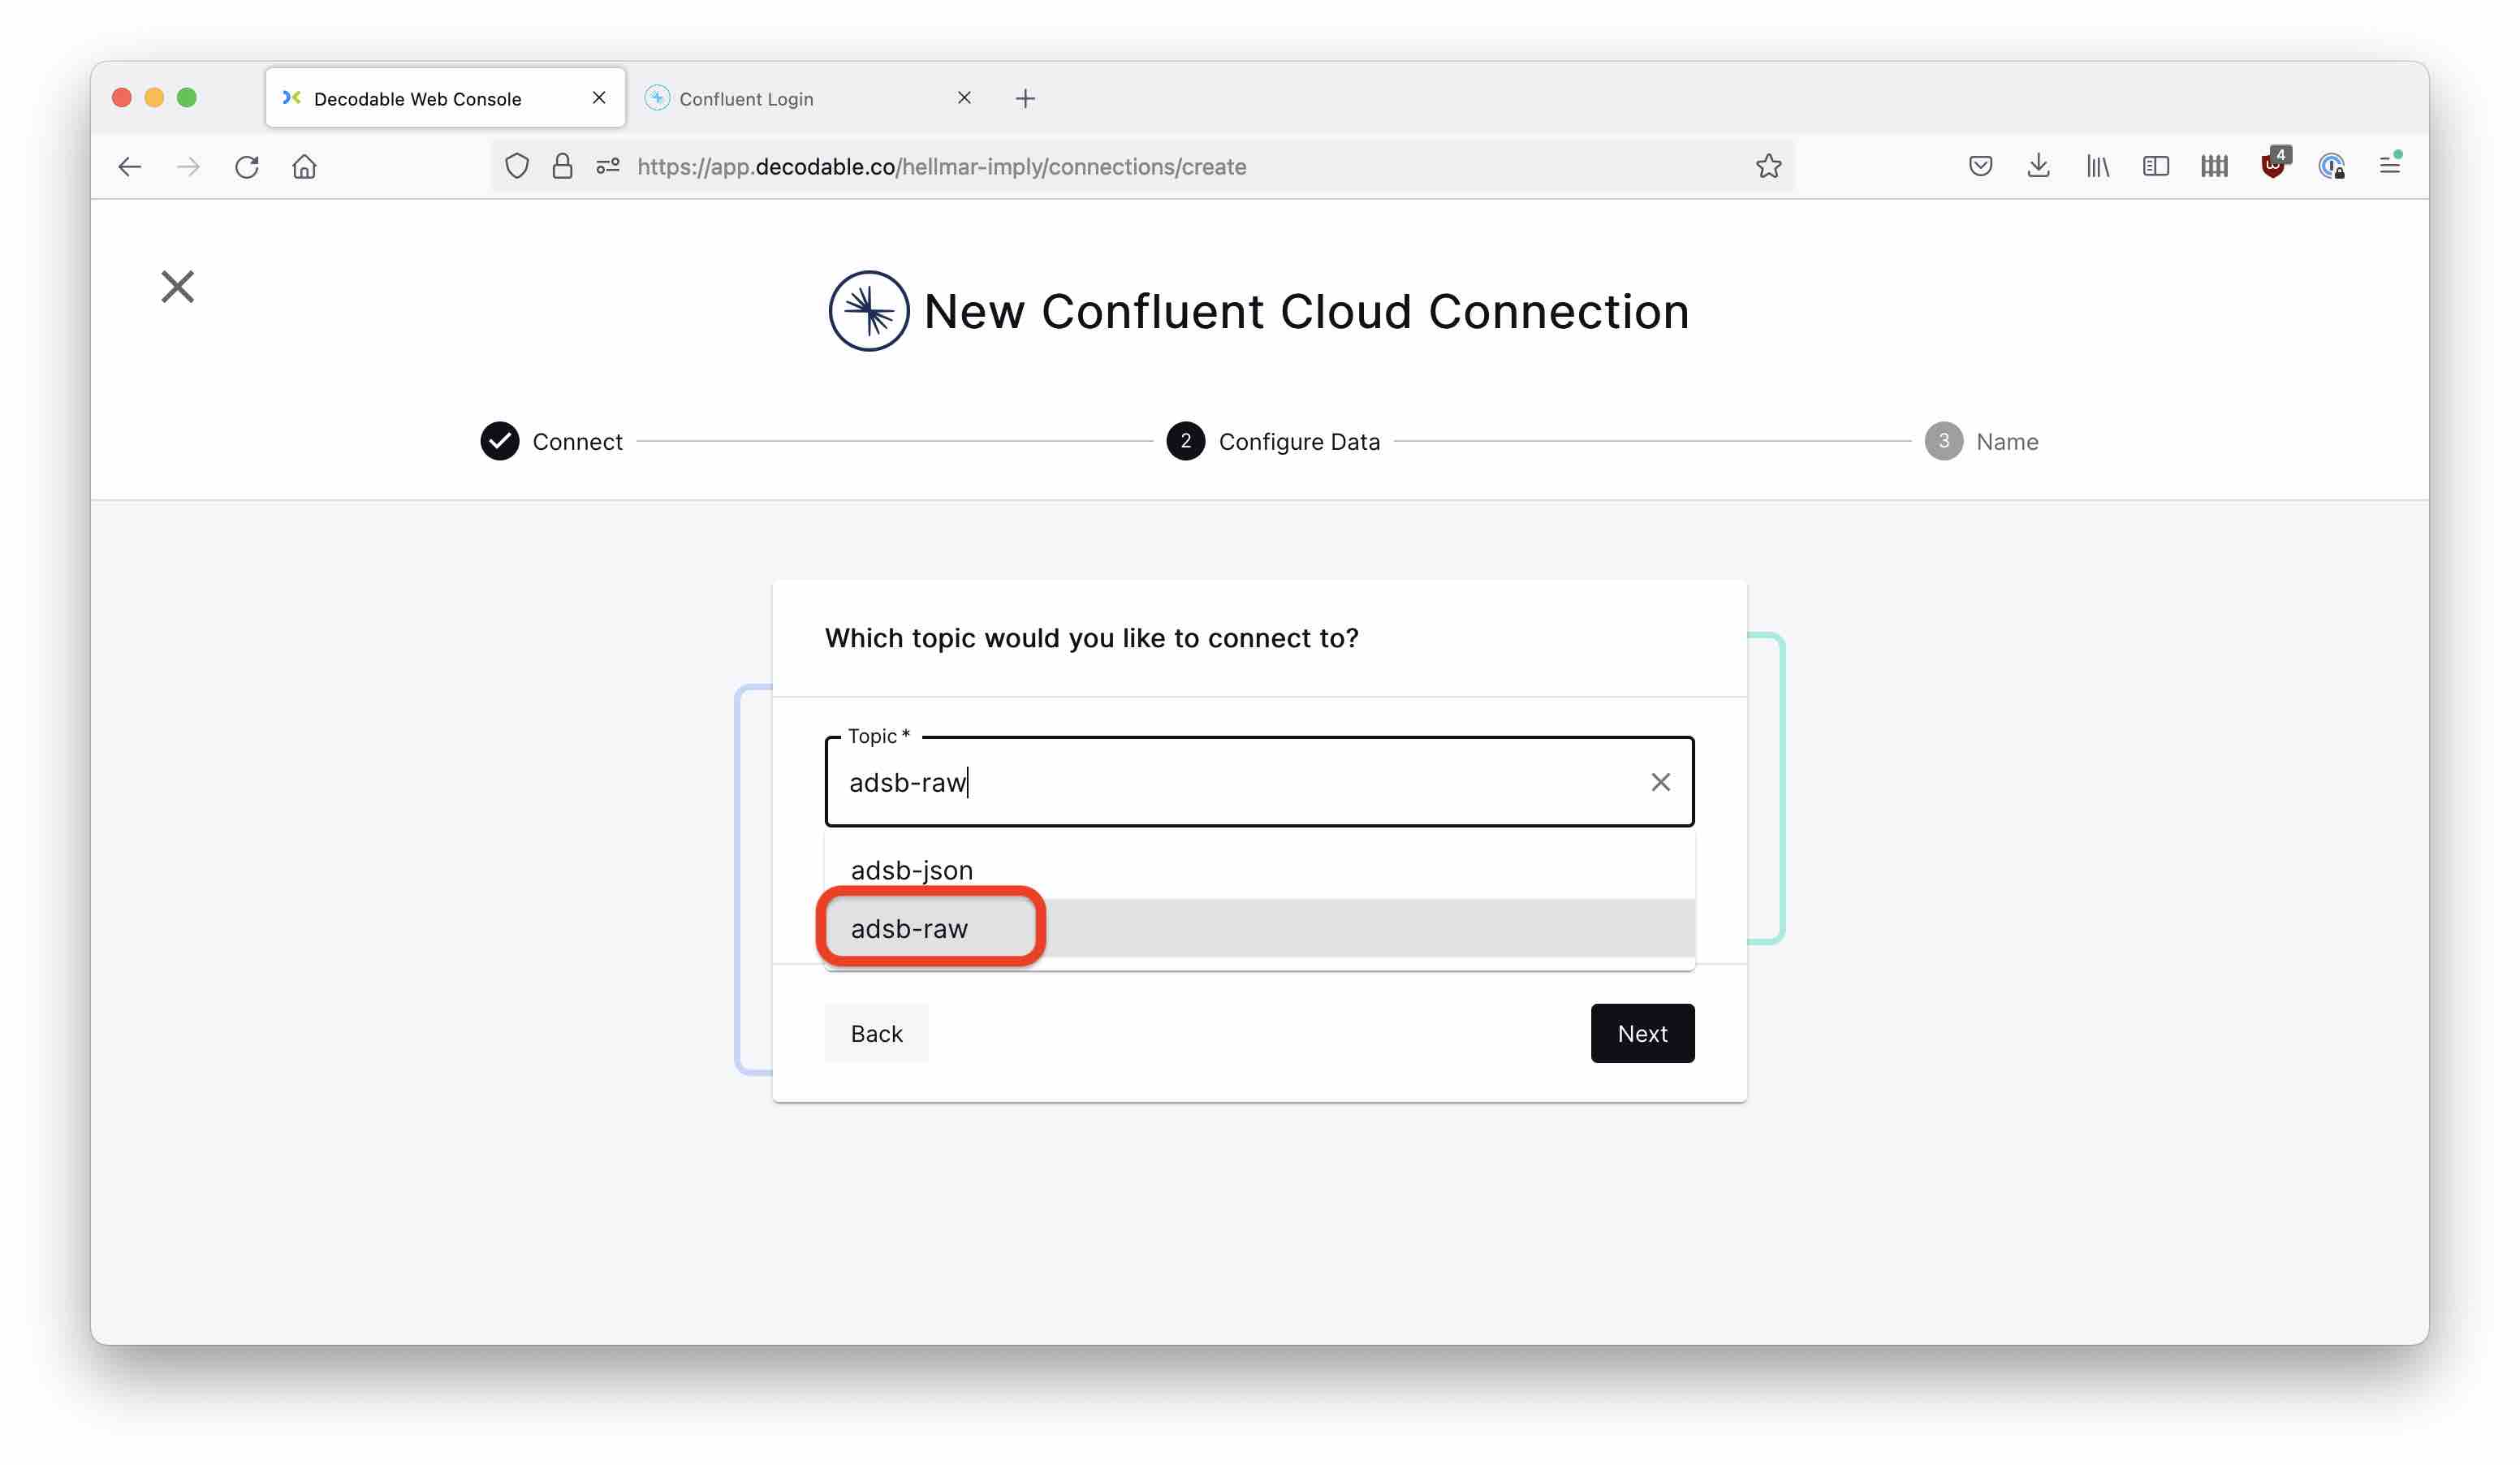
In the next step, specify adsb-raw as the topic to connect to.
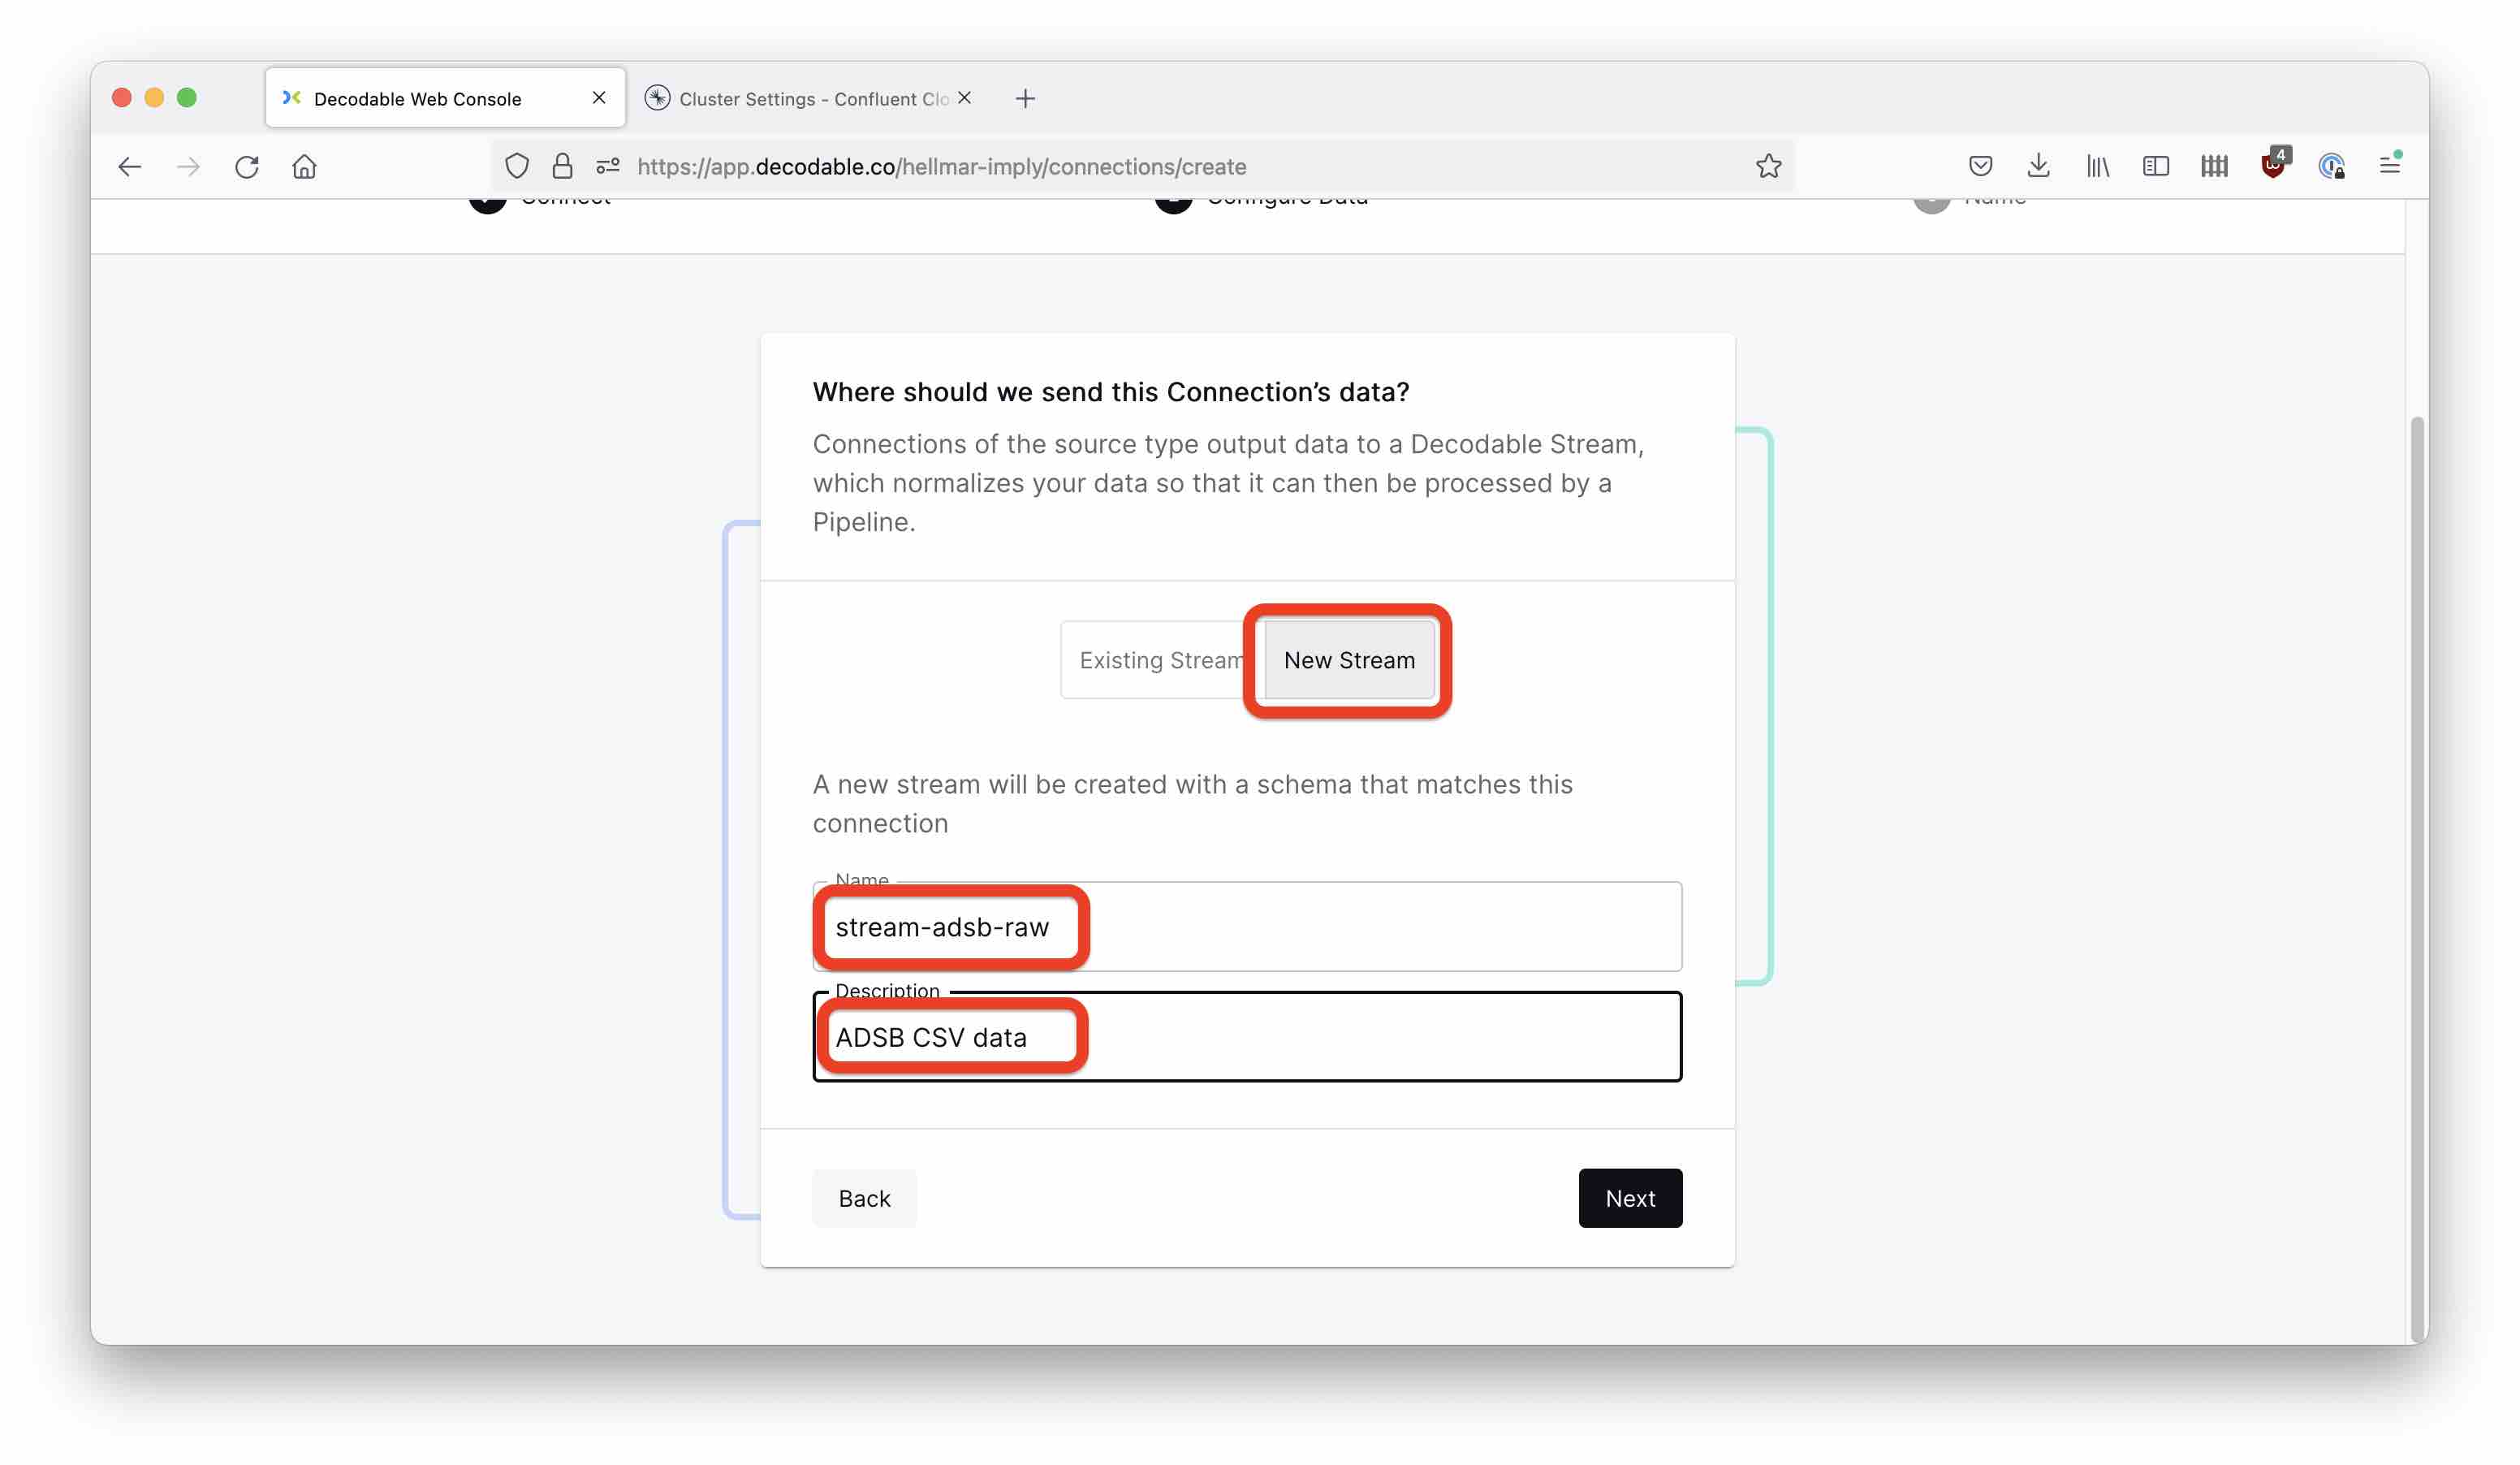
Next, Decodable is going to ask which stream to connect to. You will create a new stream in this step. Select New Stream, and enter the name and description.
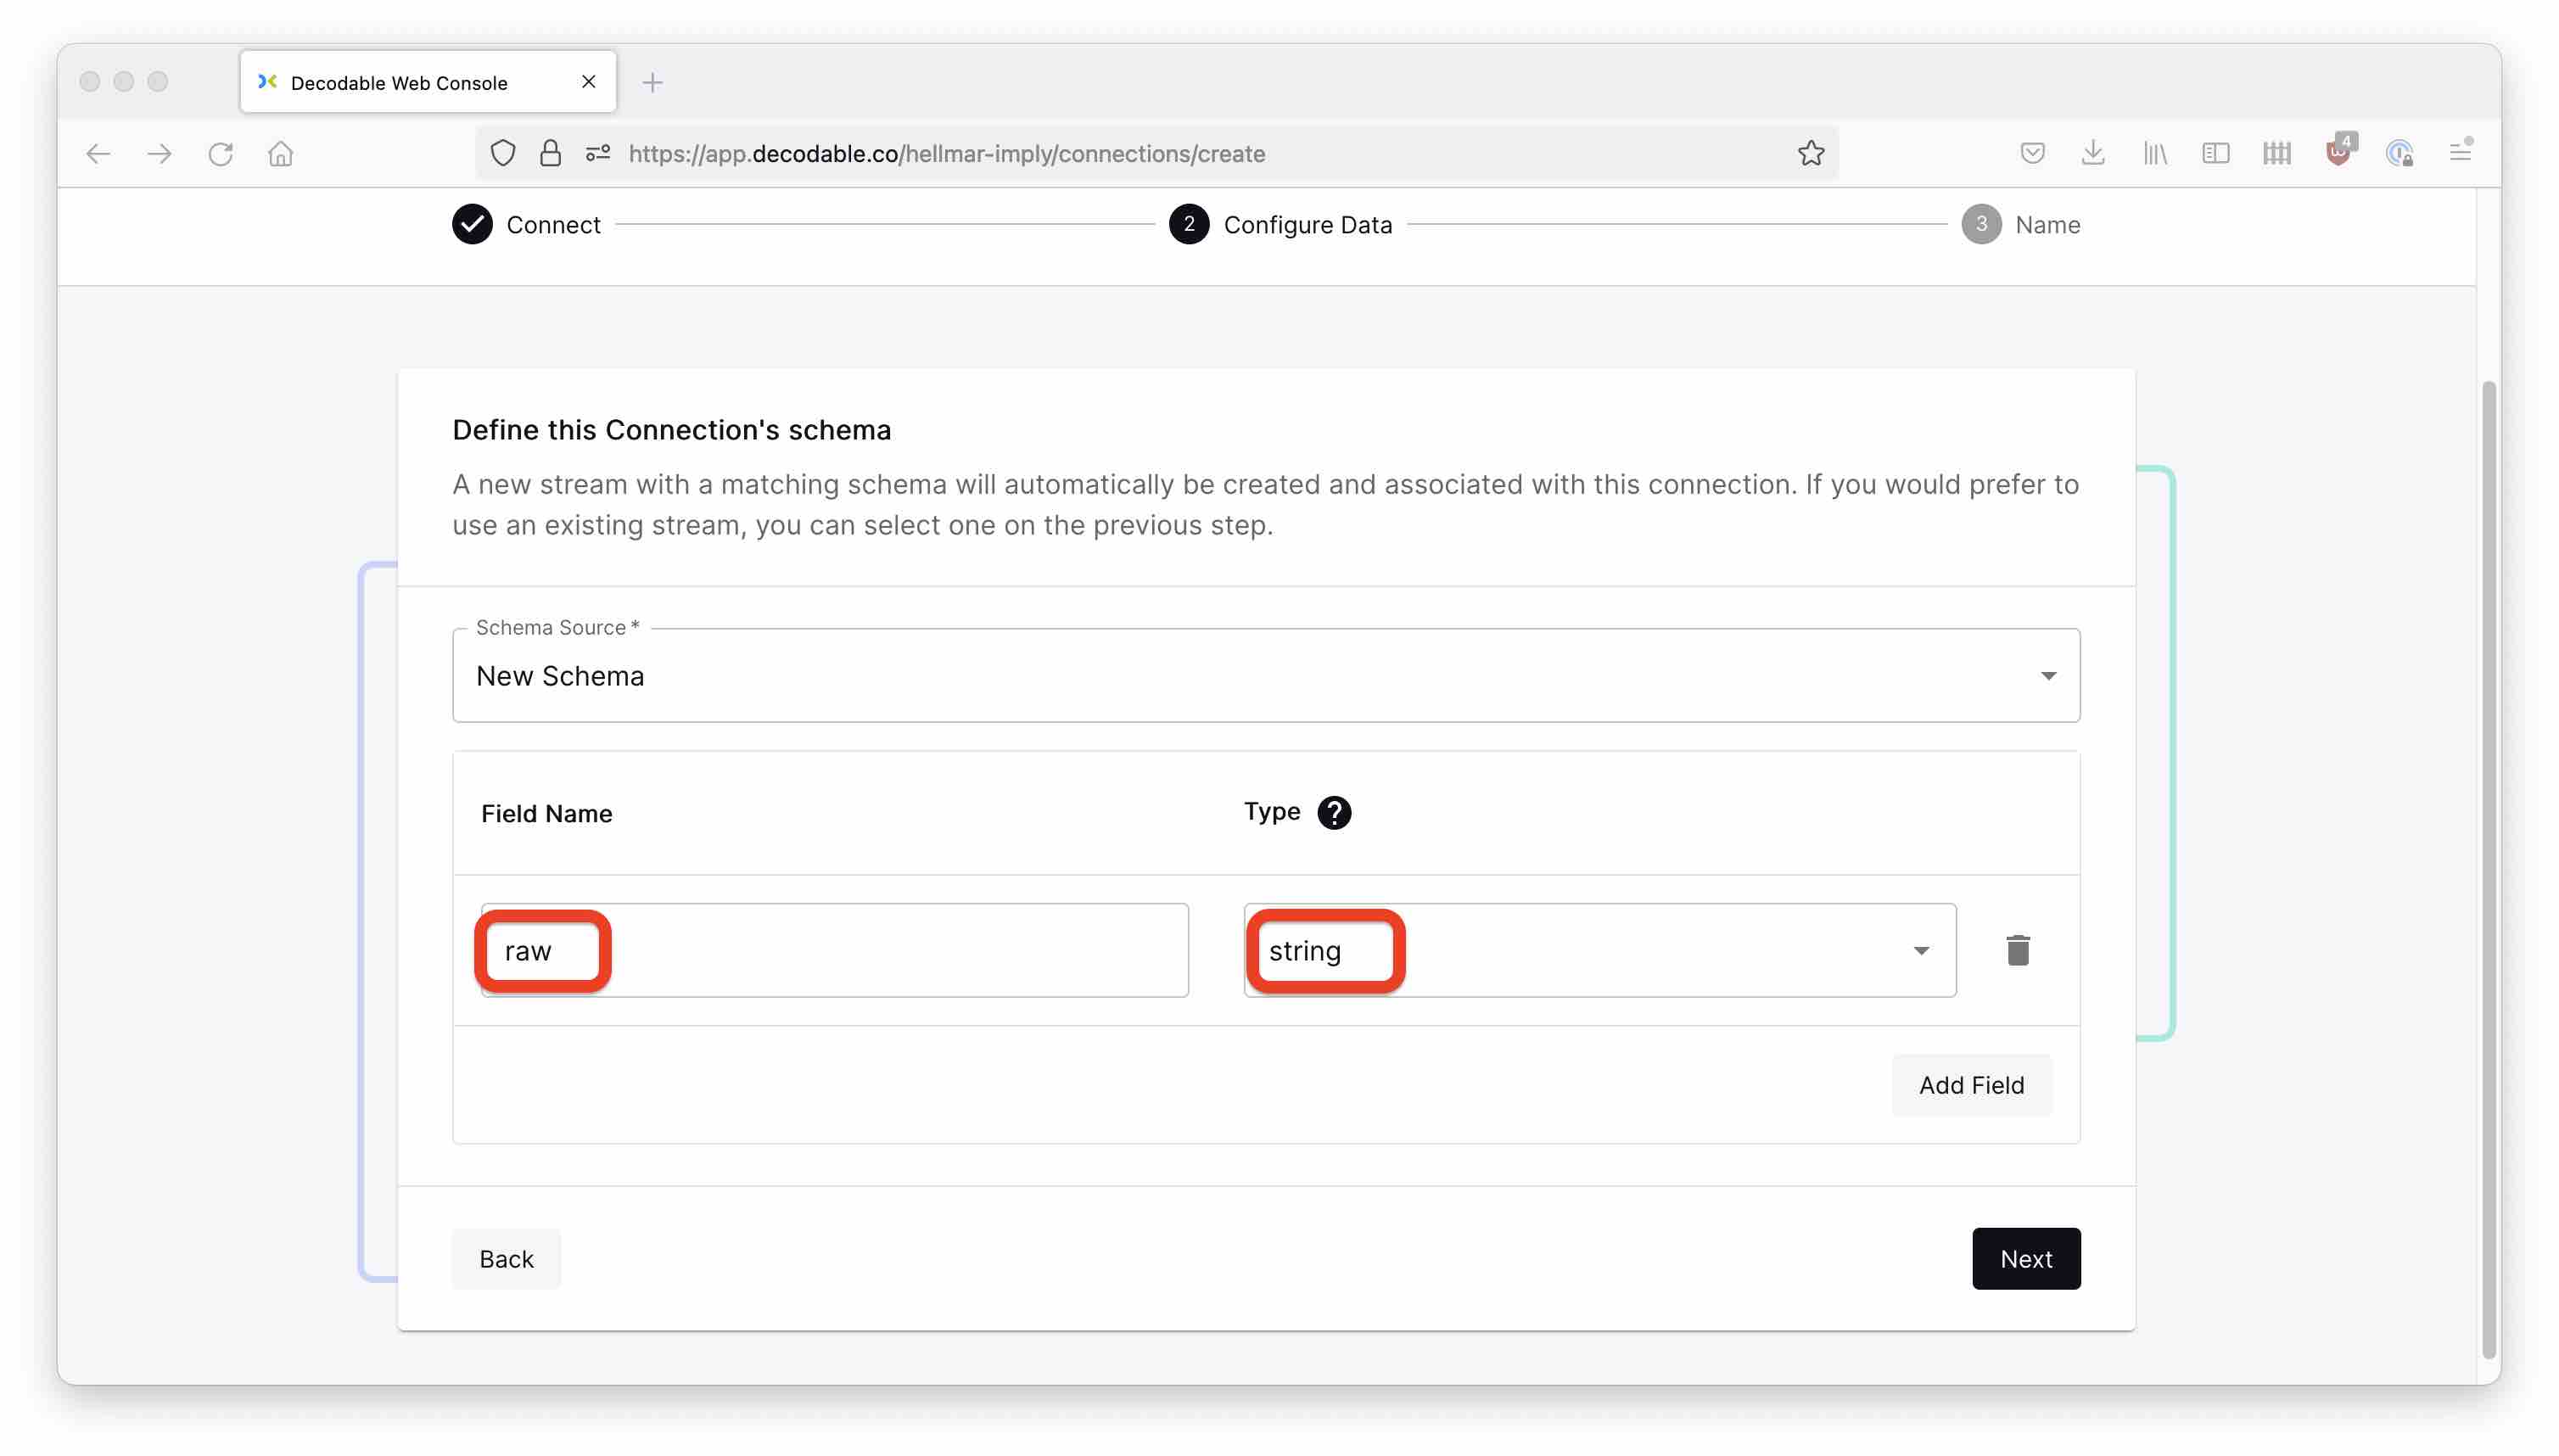
A stream also needs a schema. Since the data source format is Raw, the schema has only one field, which we will conveniently name raw. Pick string as the field type.
Hit Next and define the name and description for the connection:
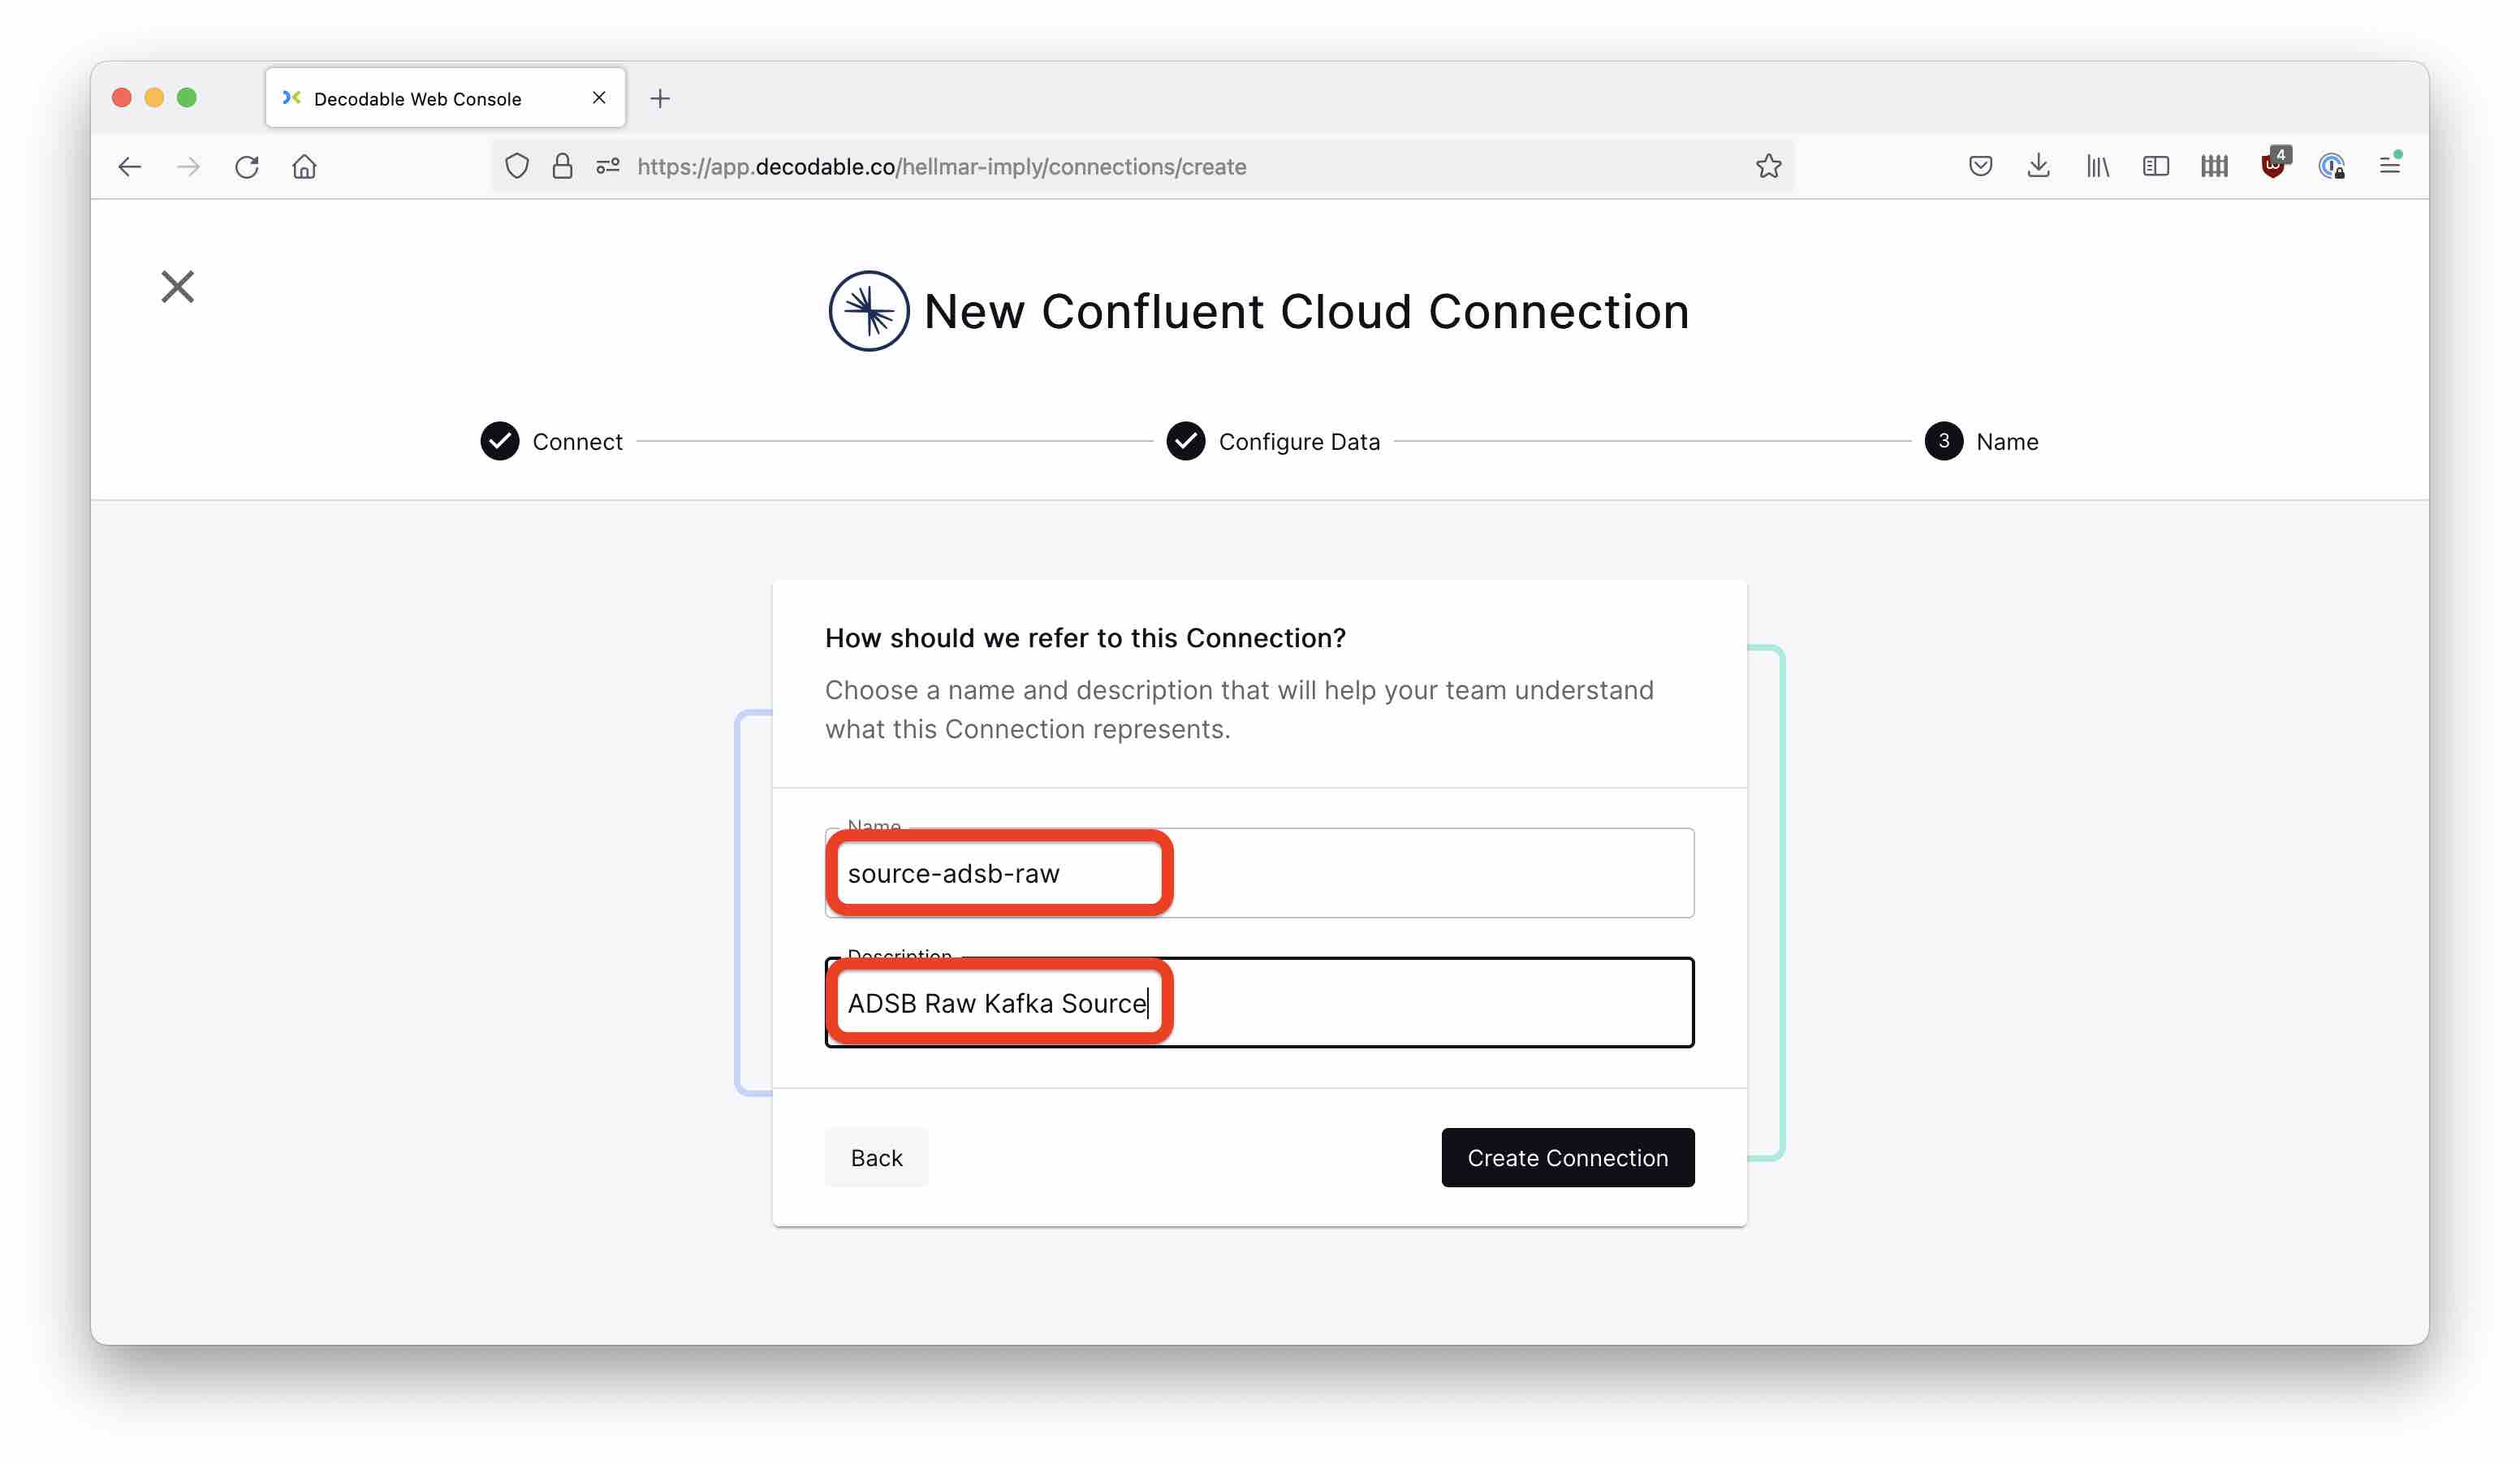
Start the connection using the Start button.
Transforming the data
Next, let’s create a Pipeline. Use the Create Pipeline button and select stream-adsb-raw as the input source. In the following dialog, enter this SQL code:
insert into `stream-adsb-json`
select
    to_timestamp(
        split_index(`raw`, ',',  6) || ' ' || split_index(`raw`, ',',  7),
        'yyyy/MM/dd HH:mm:ss.SSS'
    ) as __time,
    split_index(`raw`, ',',  0) as message_type,
    cast(split_index(`raw`, ',',  1) as integer) as transmission_type,
    cast(split_index(`raw`, ',',  2) as integer) as session_id,
    cast(split_index(`raw`, ',',  3) as integer) as aircraft_id,
    split_index(`raw`, ',',  4) as hex_ident,
    cast(split_index(`raw`, ',',  5) as integer) as flight_id,
    split_index(`raw`, ',',  6) as date_message_generated,
    split_index(`raw`, ',',  7) as time_message_generated,
    split_index(`raw`, ',',  8) as date_message_logged,
    split_index(`raw`, ',',  9) as time_message_logged,
    split_index(`raw`, ',', 10) as callsign,
    cast(split_index(`raw`, ',', 11) as integer) as altitude,
    cast(split_index(`raw`, ',', 12) as double) as ground_speed,
    cast(split_index(`raw`, ',', 13) as double) as track,
    cast(split_index(`raw`, ',', 14) as double) as latitude,
    cast(split_index(`raw`, ',', 15) as double) as longitude,
    cast(split_index(`raw`, ',', 16) as integer) as vertical_rate,
    split_index(`raw`, ',', 17) as squawk,
    cast(split_index(`raw`, ',', 18) as integer) as alert,
    cast(split_index(`raw`, ',', 19) as integer) as emergency,
    cast(split_index(`raw`, ',', 20) as integer) as spi,
    cast(split_index(`raw`, ',', 21) as integer) as is_on_ground
from `stream-adsb-raw`
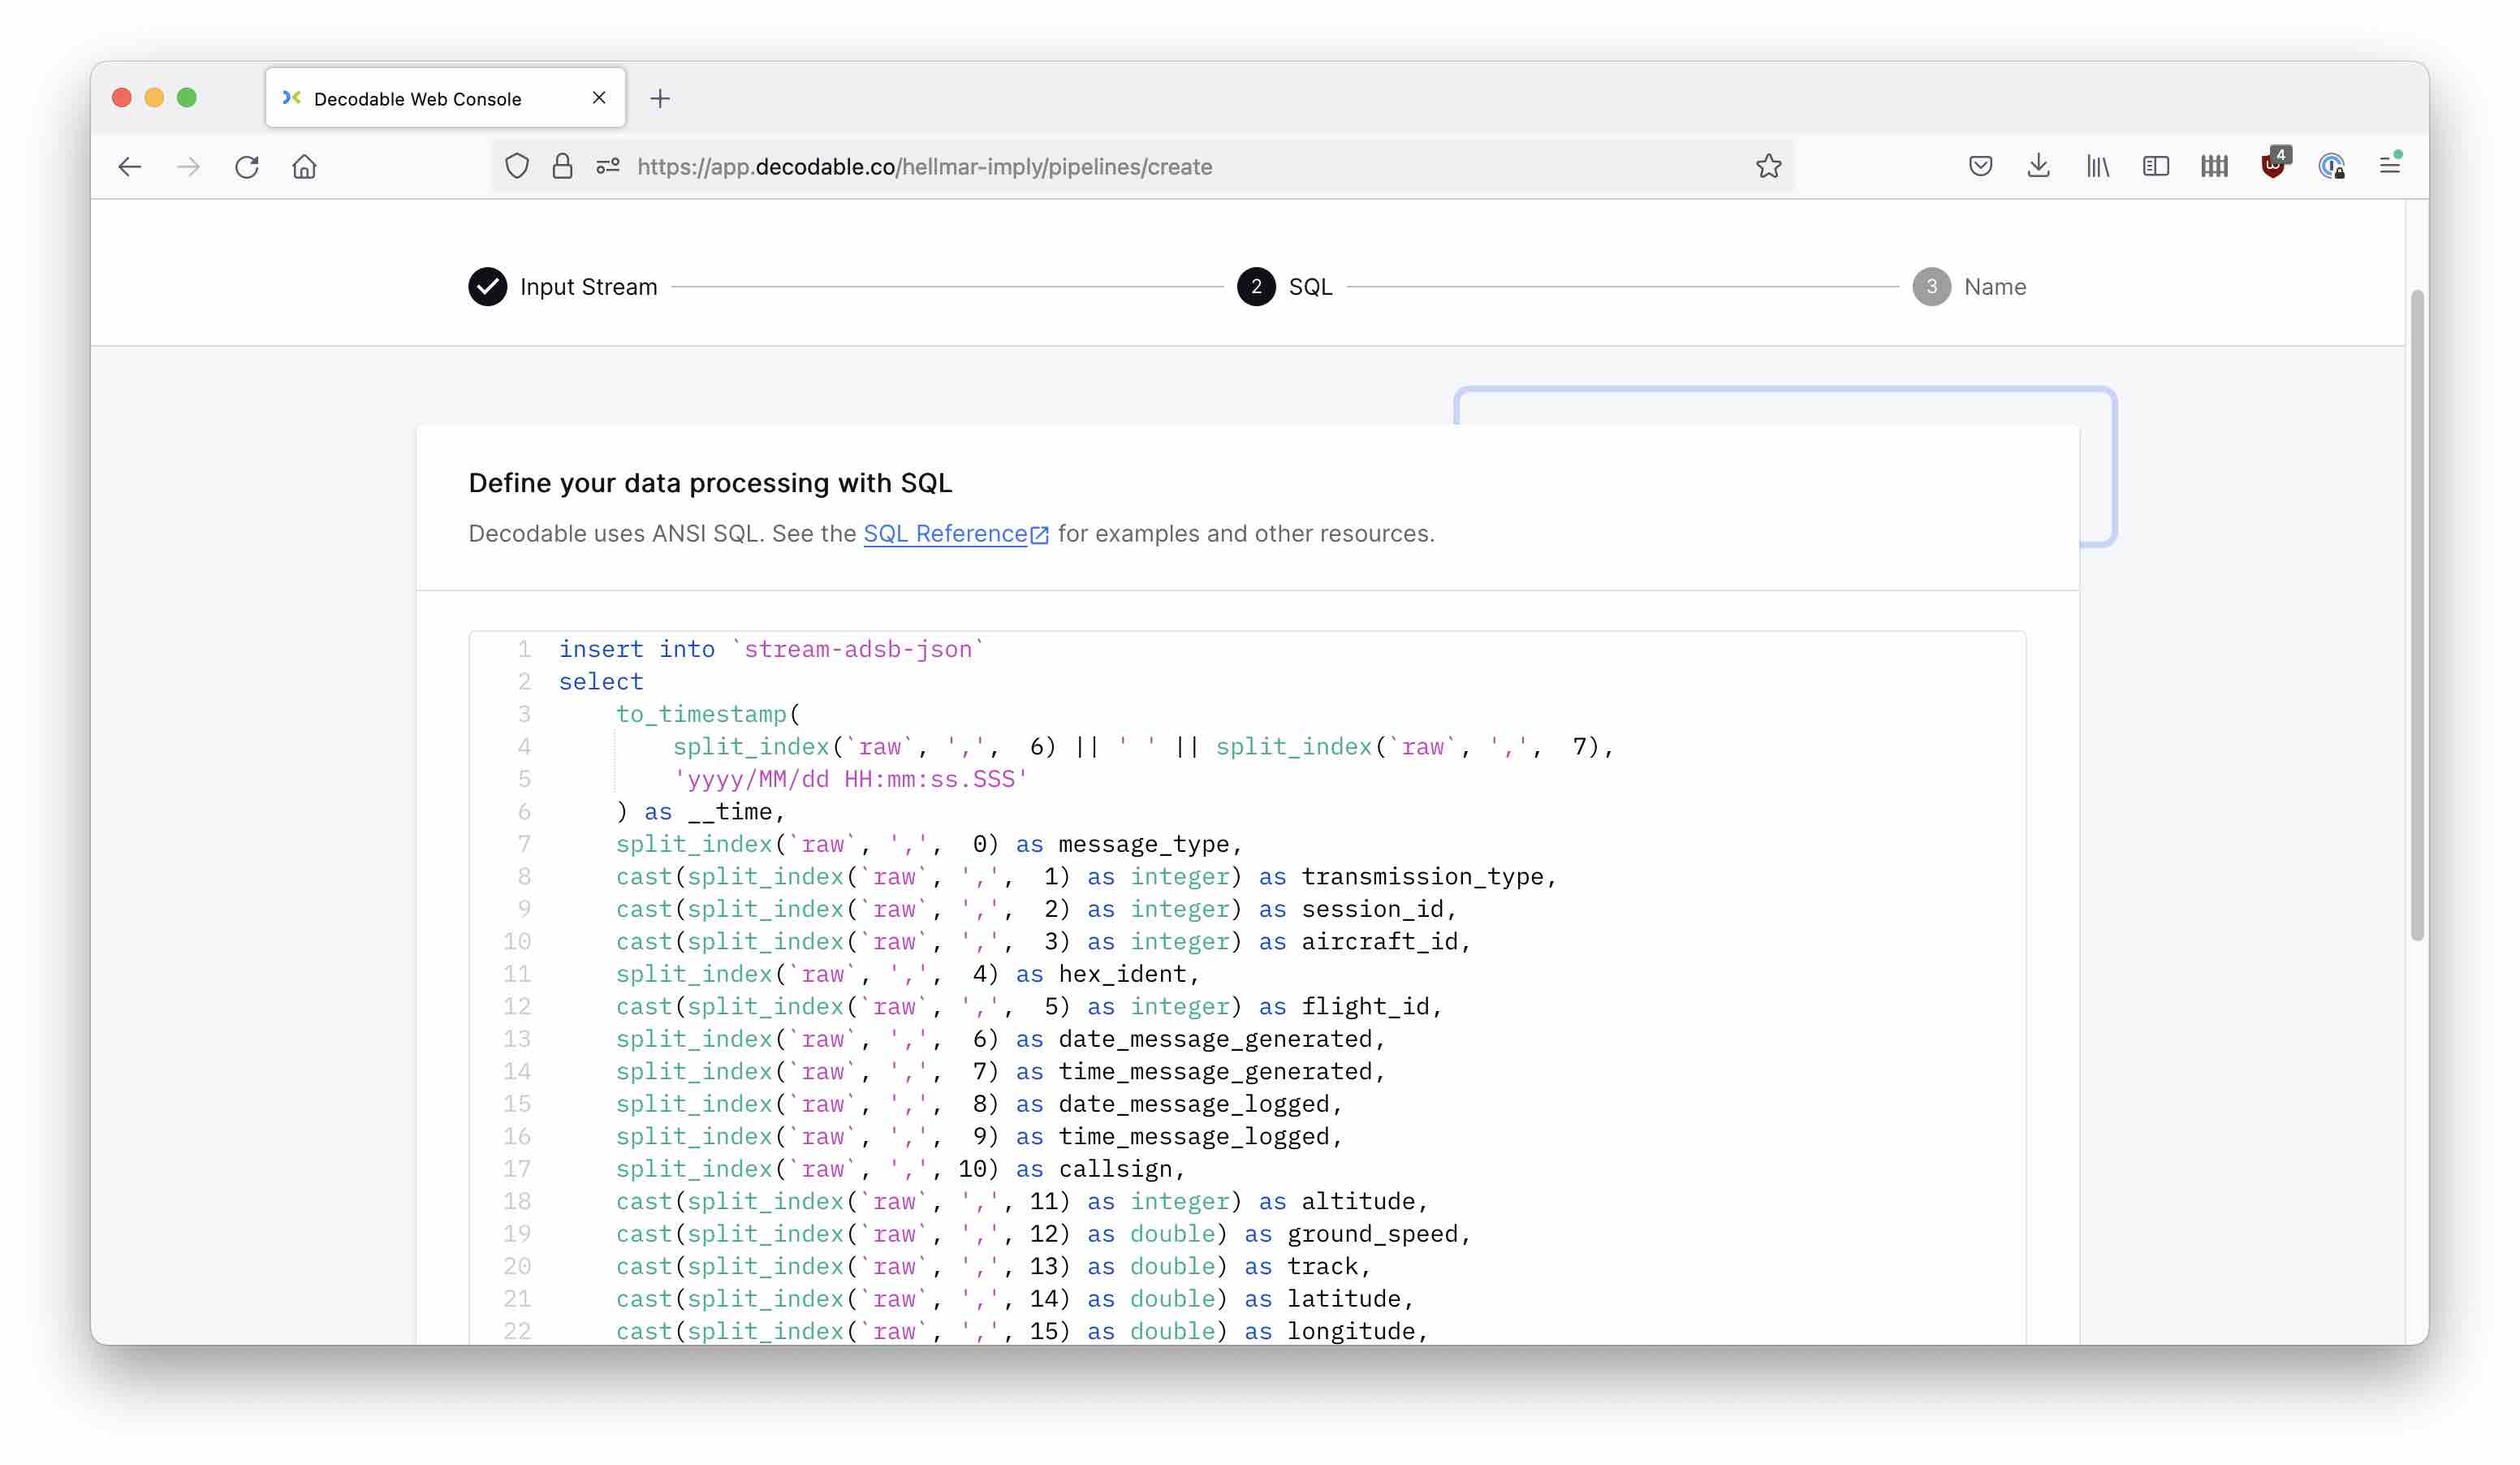
We are doing a few things here:
- We extract the individual comma separated fields.
- We assign the correct types so numbers will be encoded as numbers in the resulting JSON.
- Since date and time are in separate original fields, we build a timestamp string out of both, we parse it and represent it as milliseconds since Epoch. This is the native timestamp format for Polaris.
The INSERT INTO clause defines the output stream name. Since that stream doesn’t exist yet, we create it in the next step:
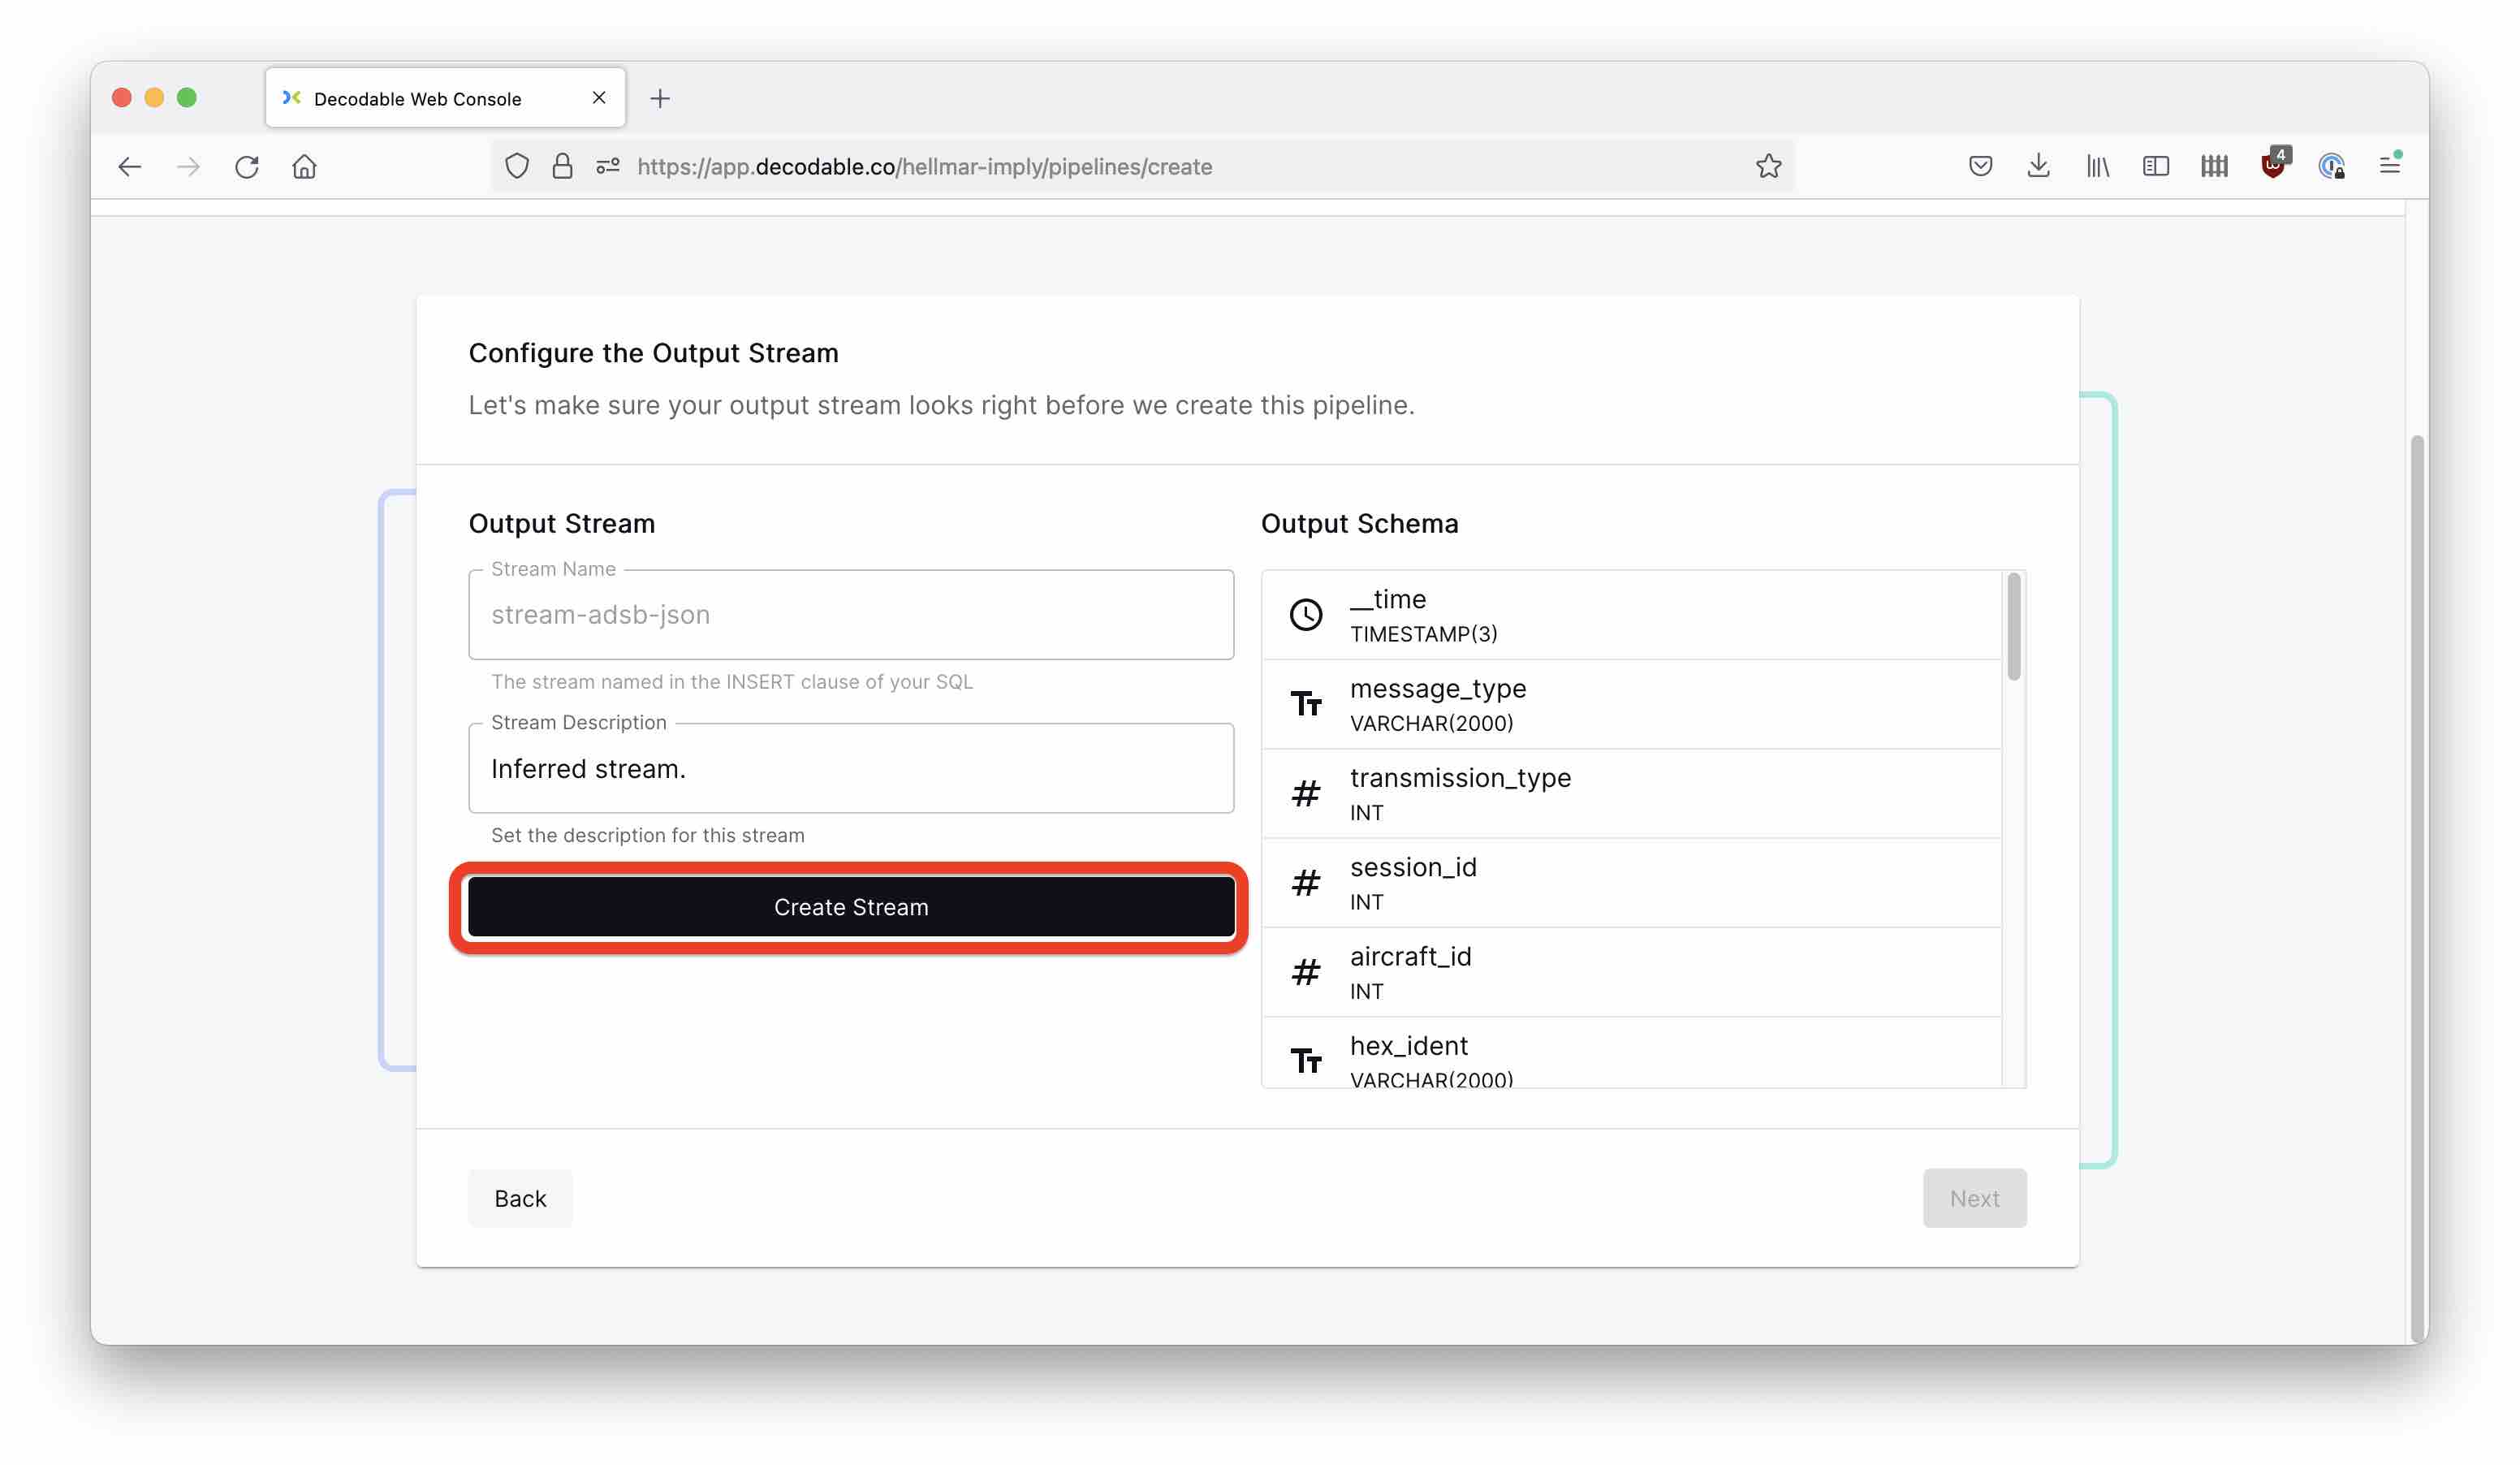

And again, hit the Start button to start the pipeline.
Putting the data back into Kafka
Lastly, we need another connection to write data back into Confluent Cloud. This works the same way as the input connection, with a few minor changes:
- In the connection settings, use the same Confluent Cloud coordinates as for the input connection. Make sure you select connection type
Sinkand value formatJSON. - For the topic, select
adsb-json. - As the source stream, select
stream-adsb-jsonthat we created before. - Name the new connection
sink-adsb-jsonand add a suitable description. - Don’t forget to start the connection using the
Startbutton.
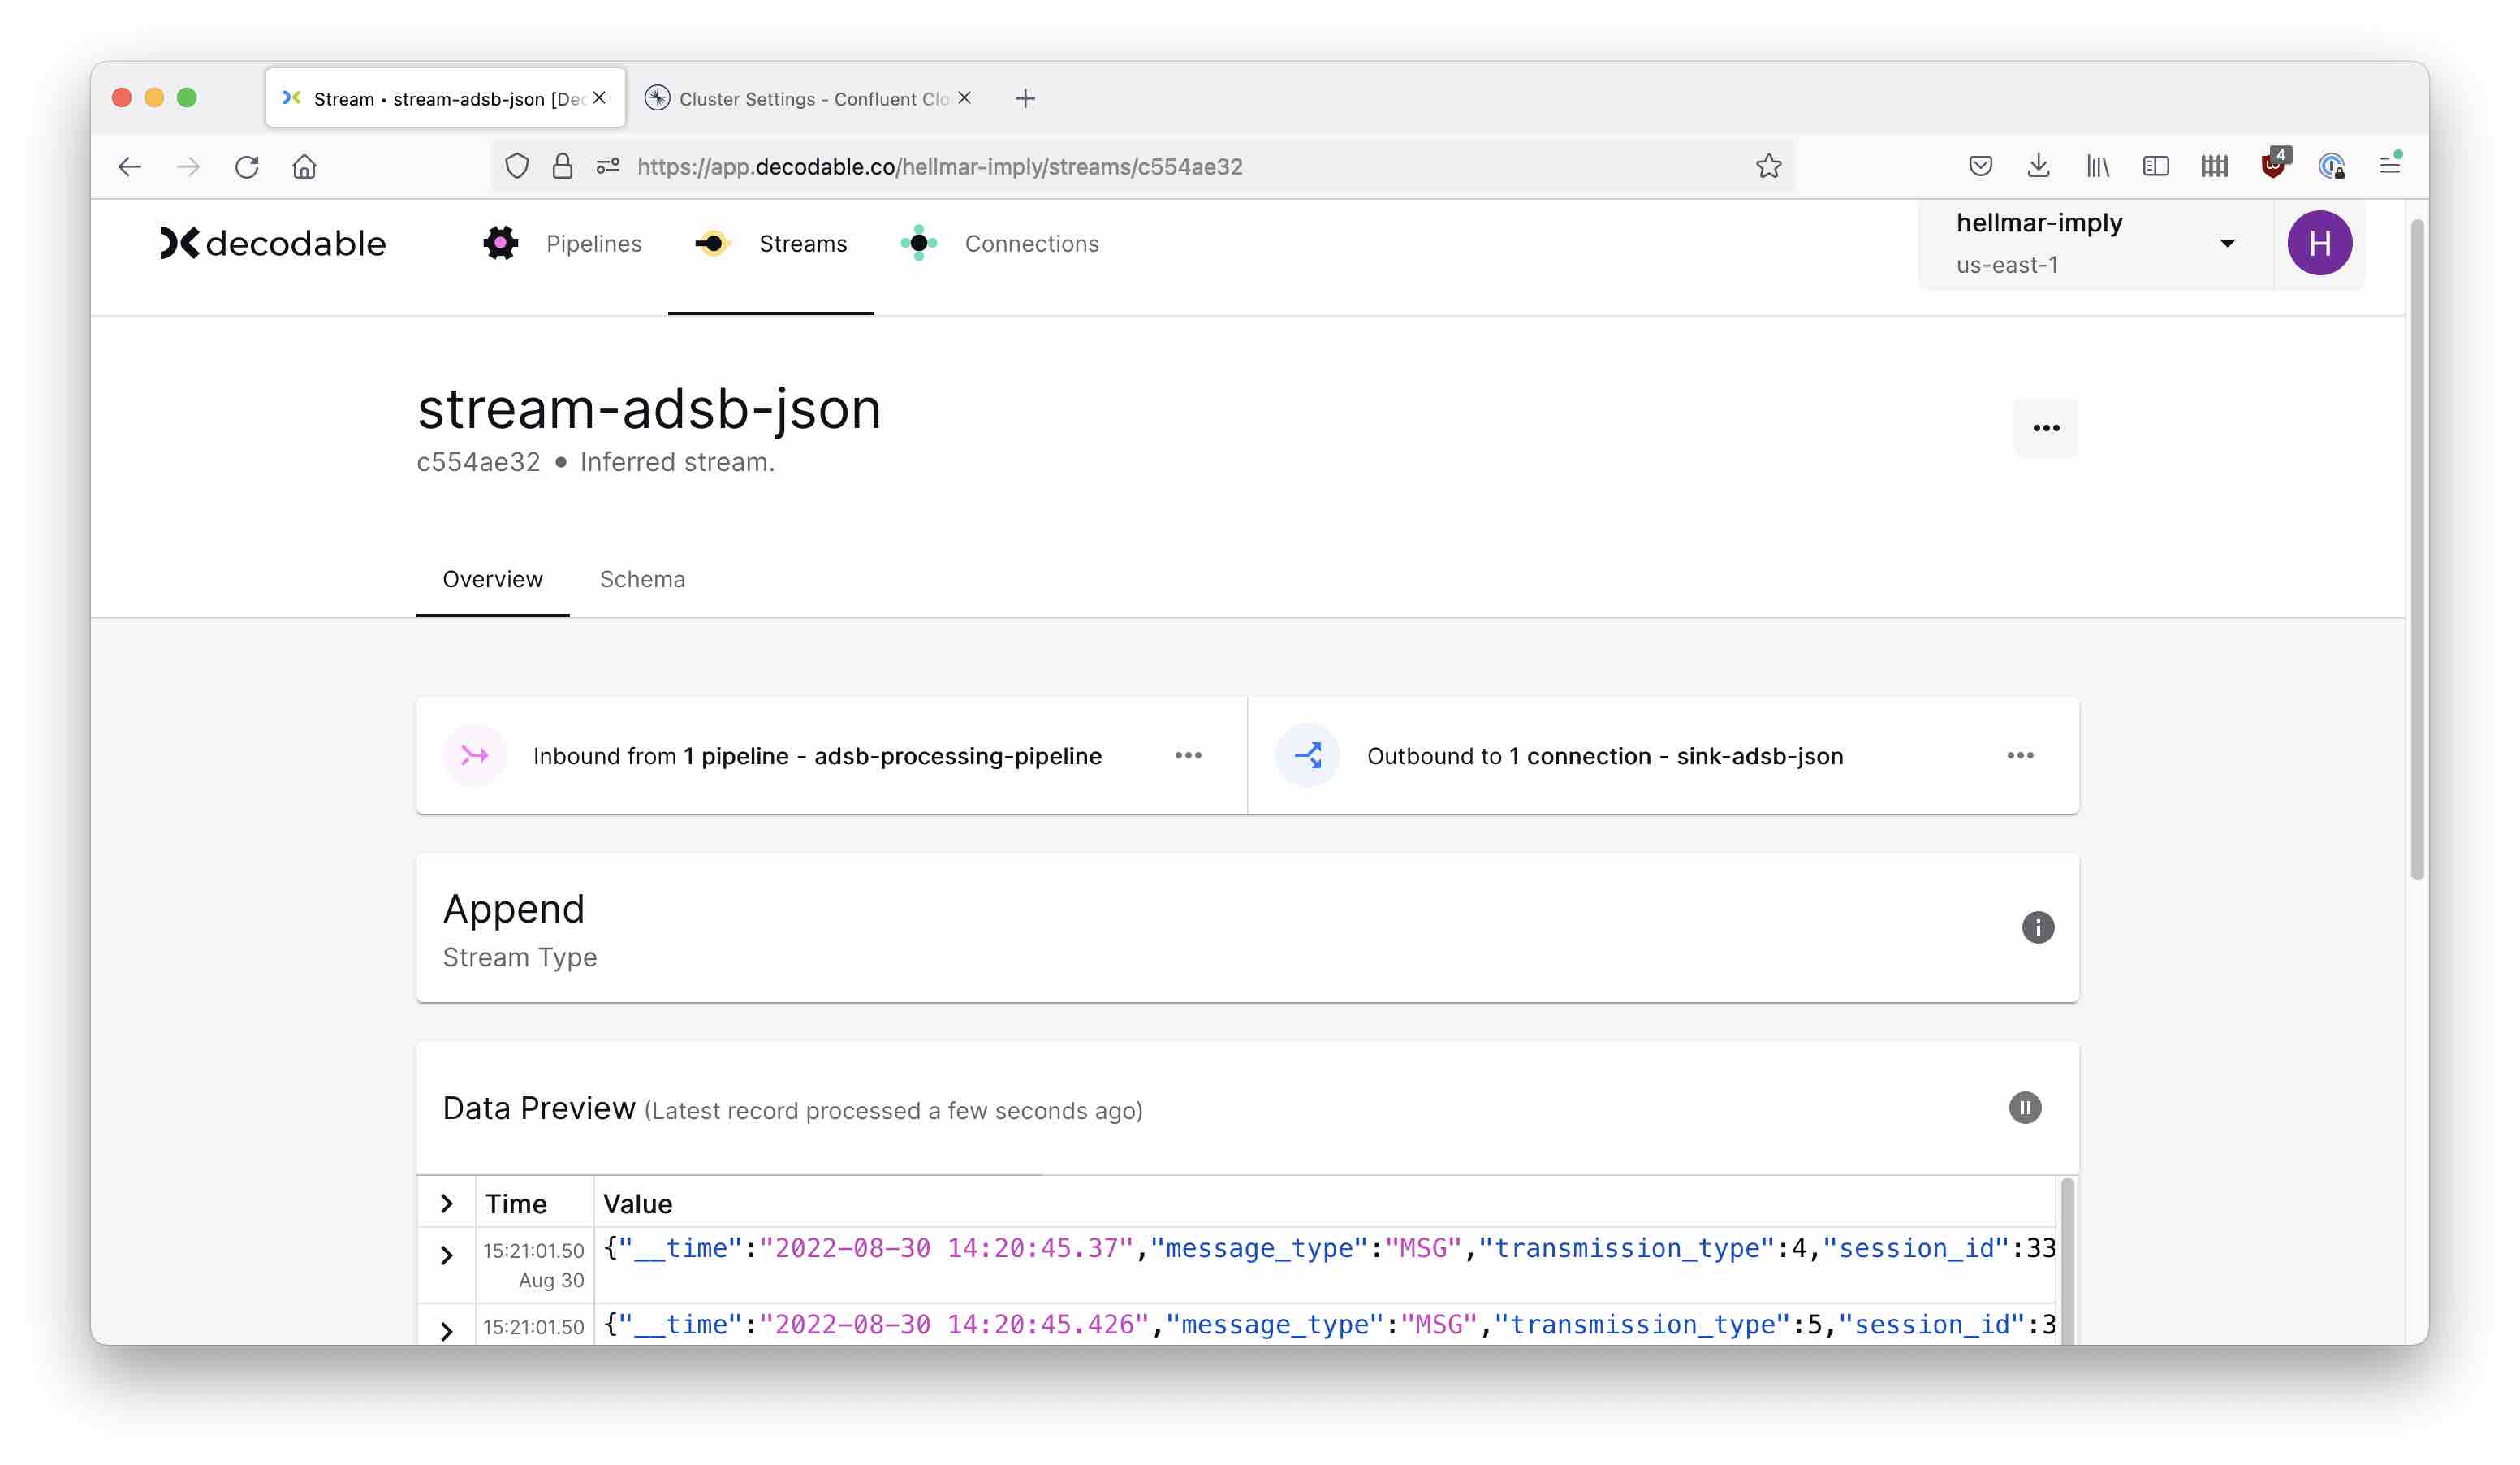
You can look into the Decodable streams and verify the data is flowing:
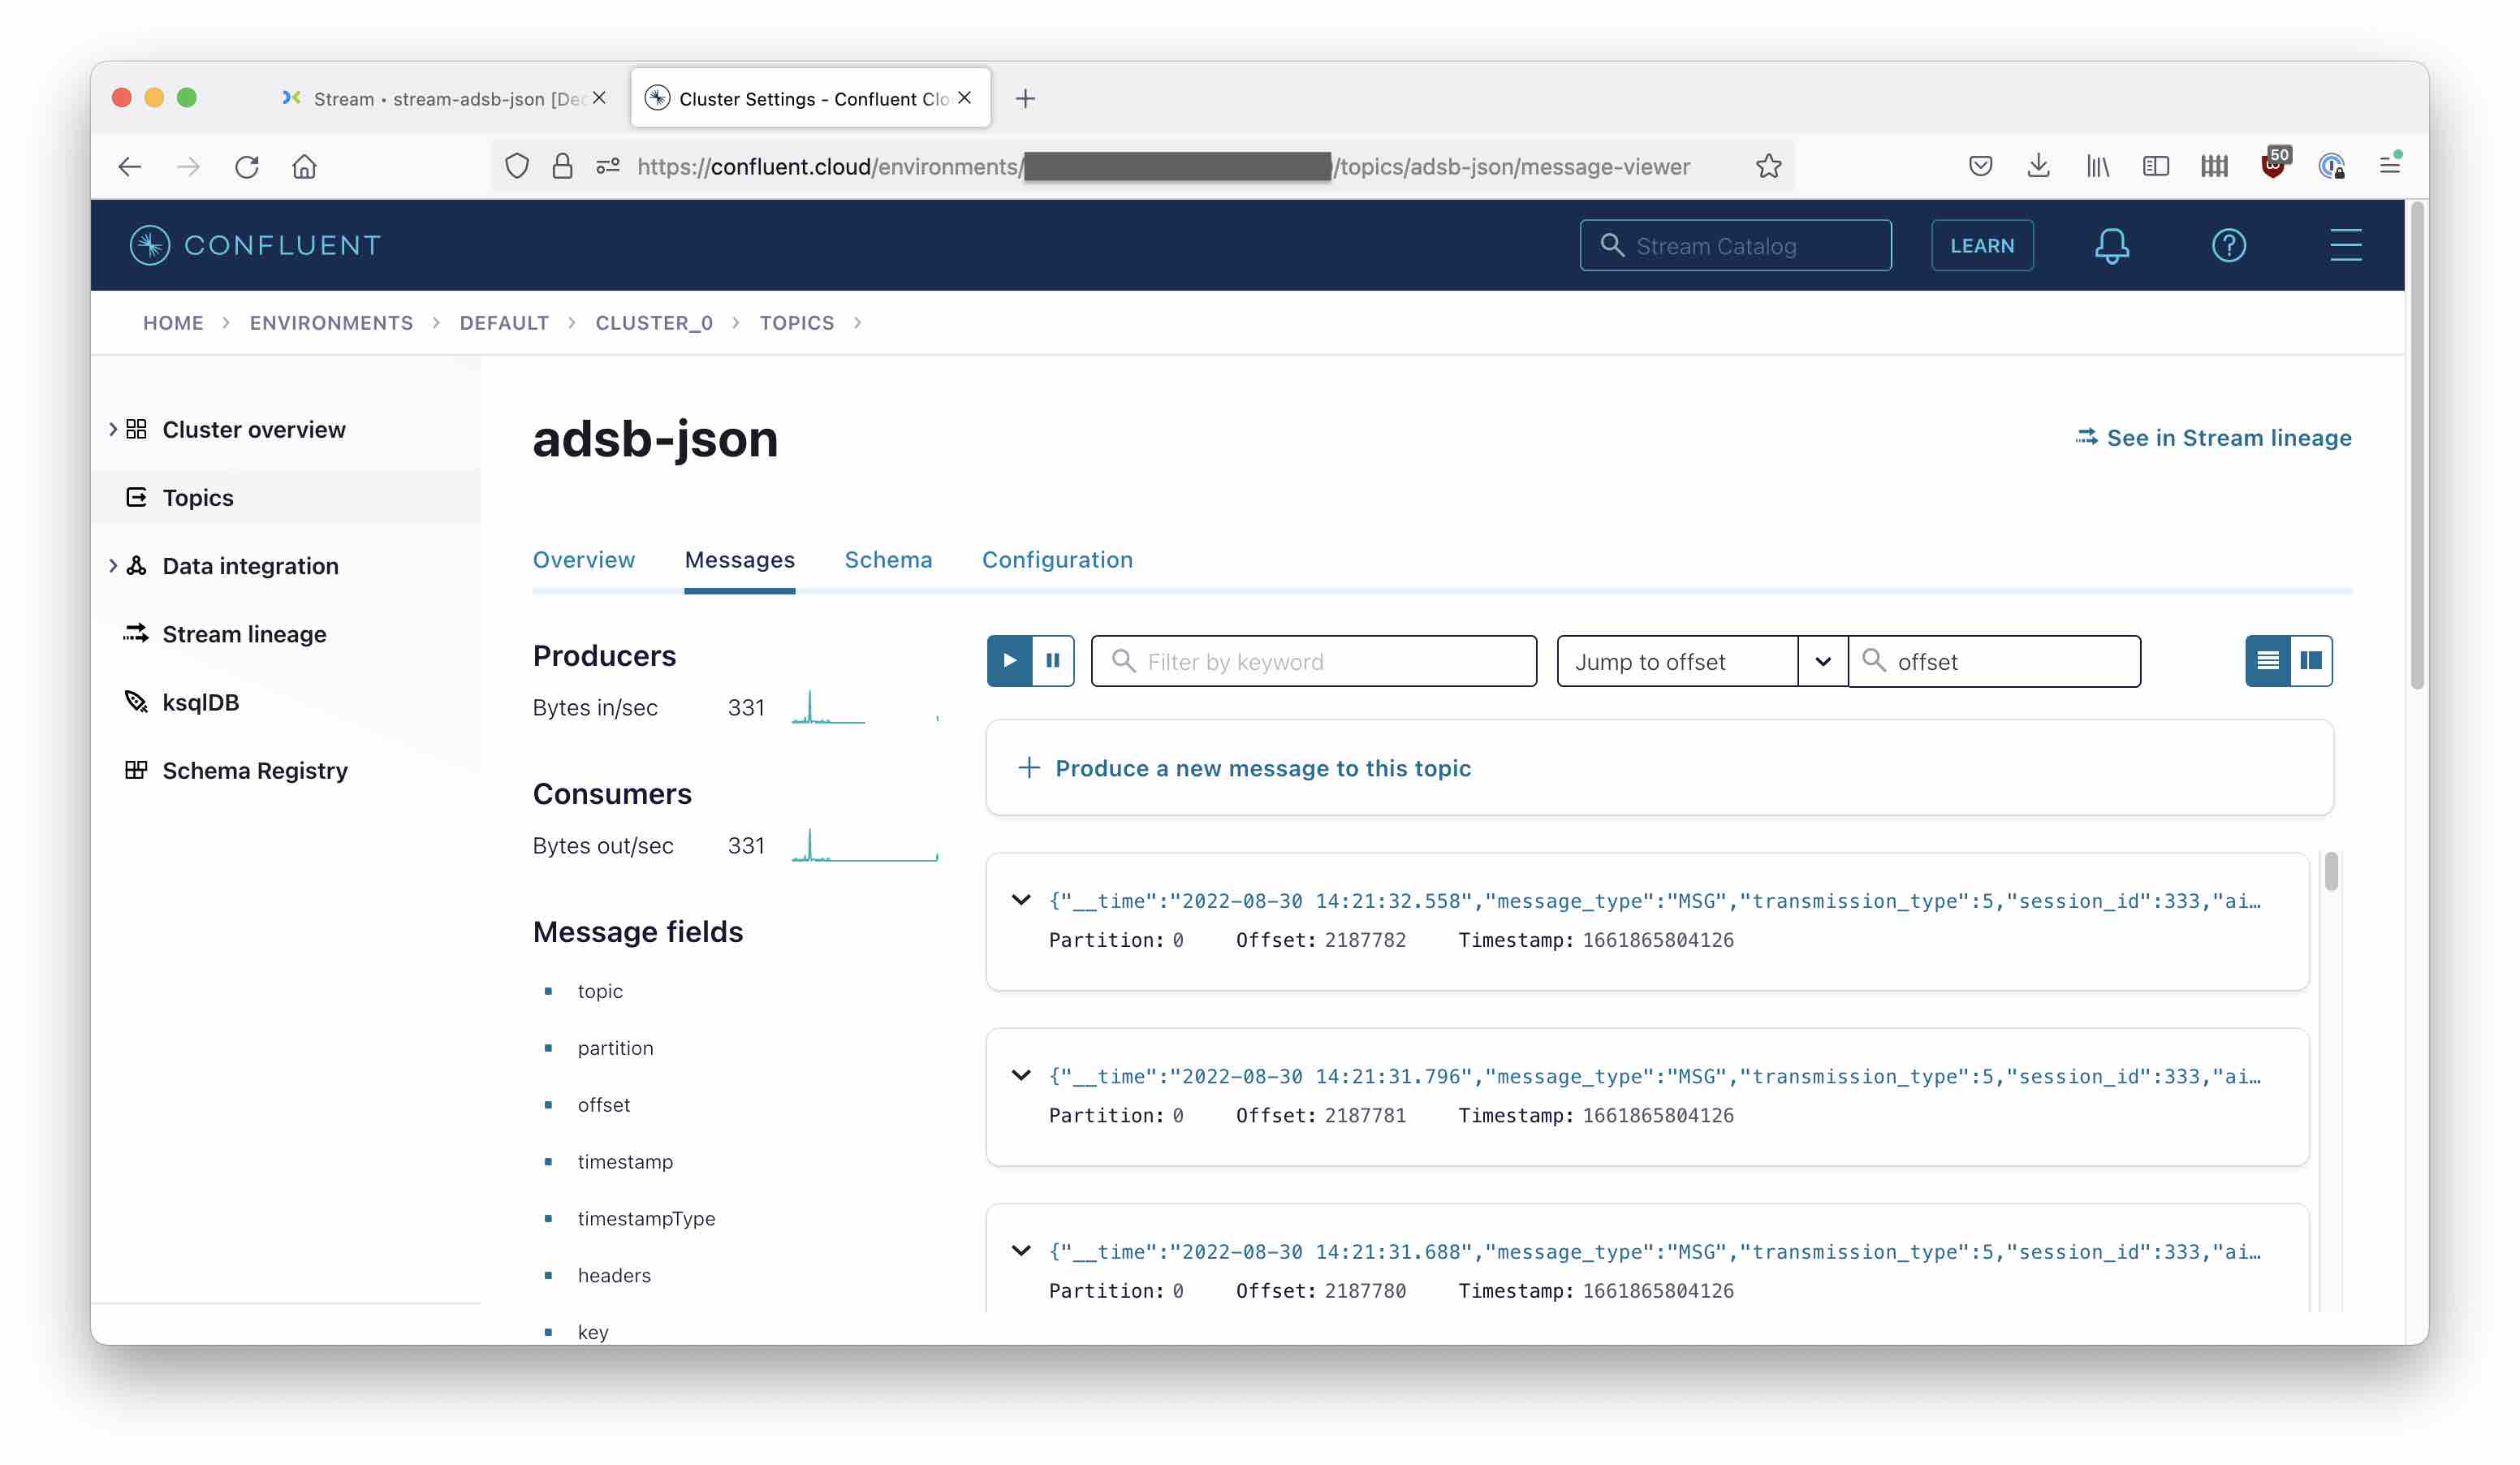
And in Confluent Cloud, verify that data is arriving the topic:
Ingesting Data into Polaris
You can sign up for a free Polaris trial at Imply.
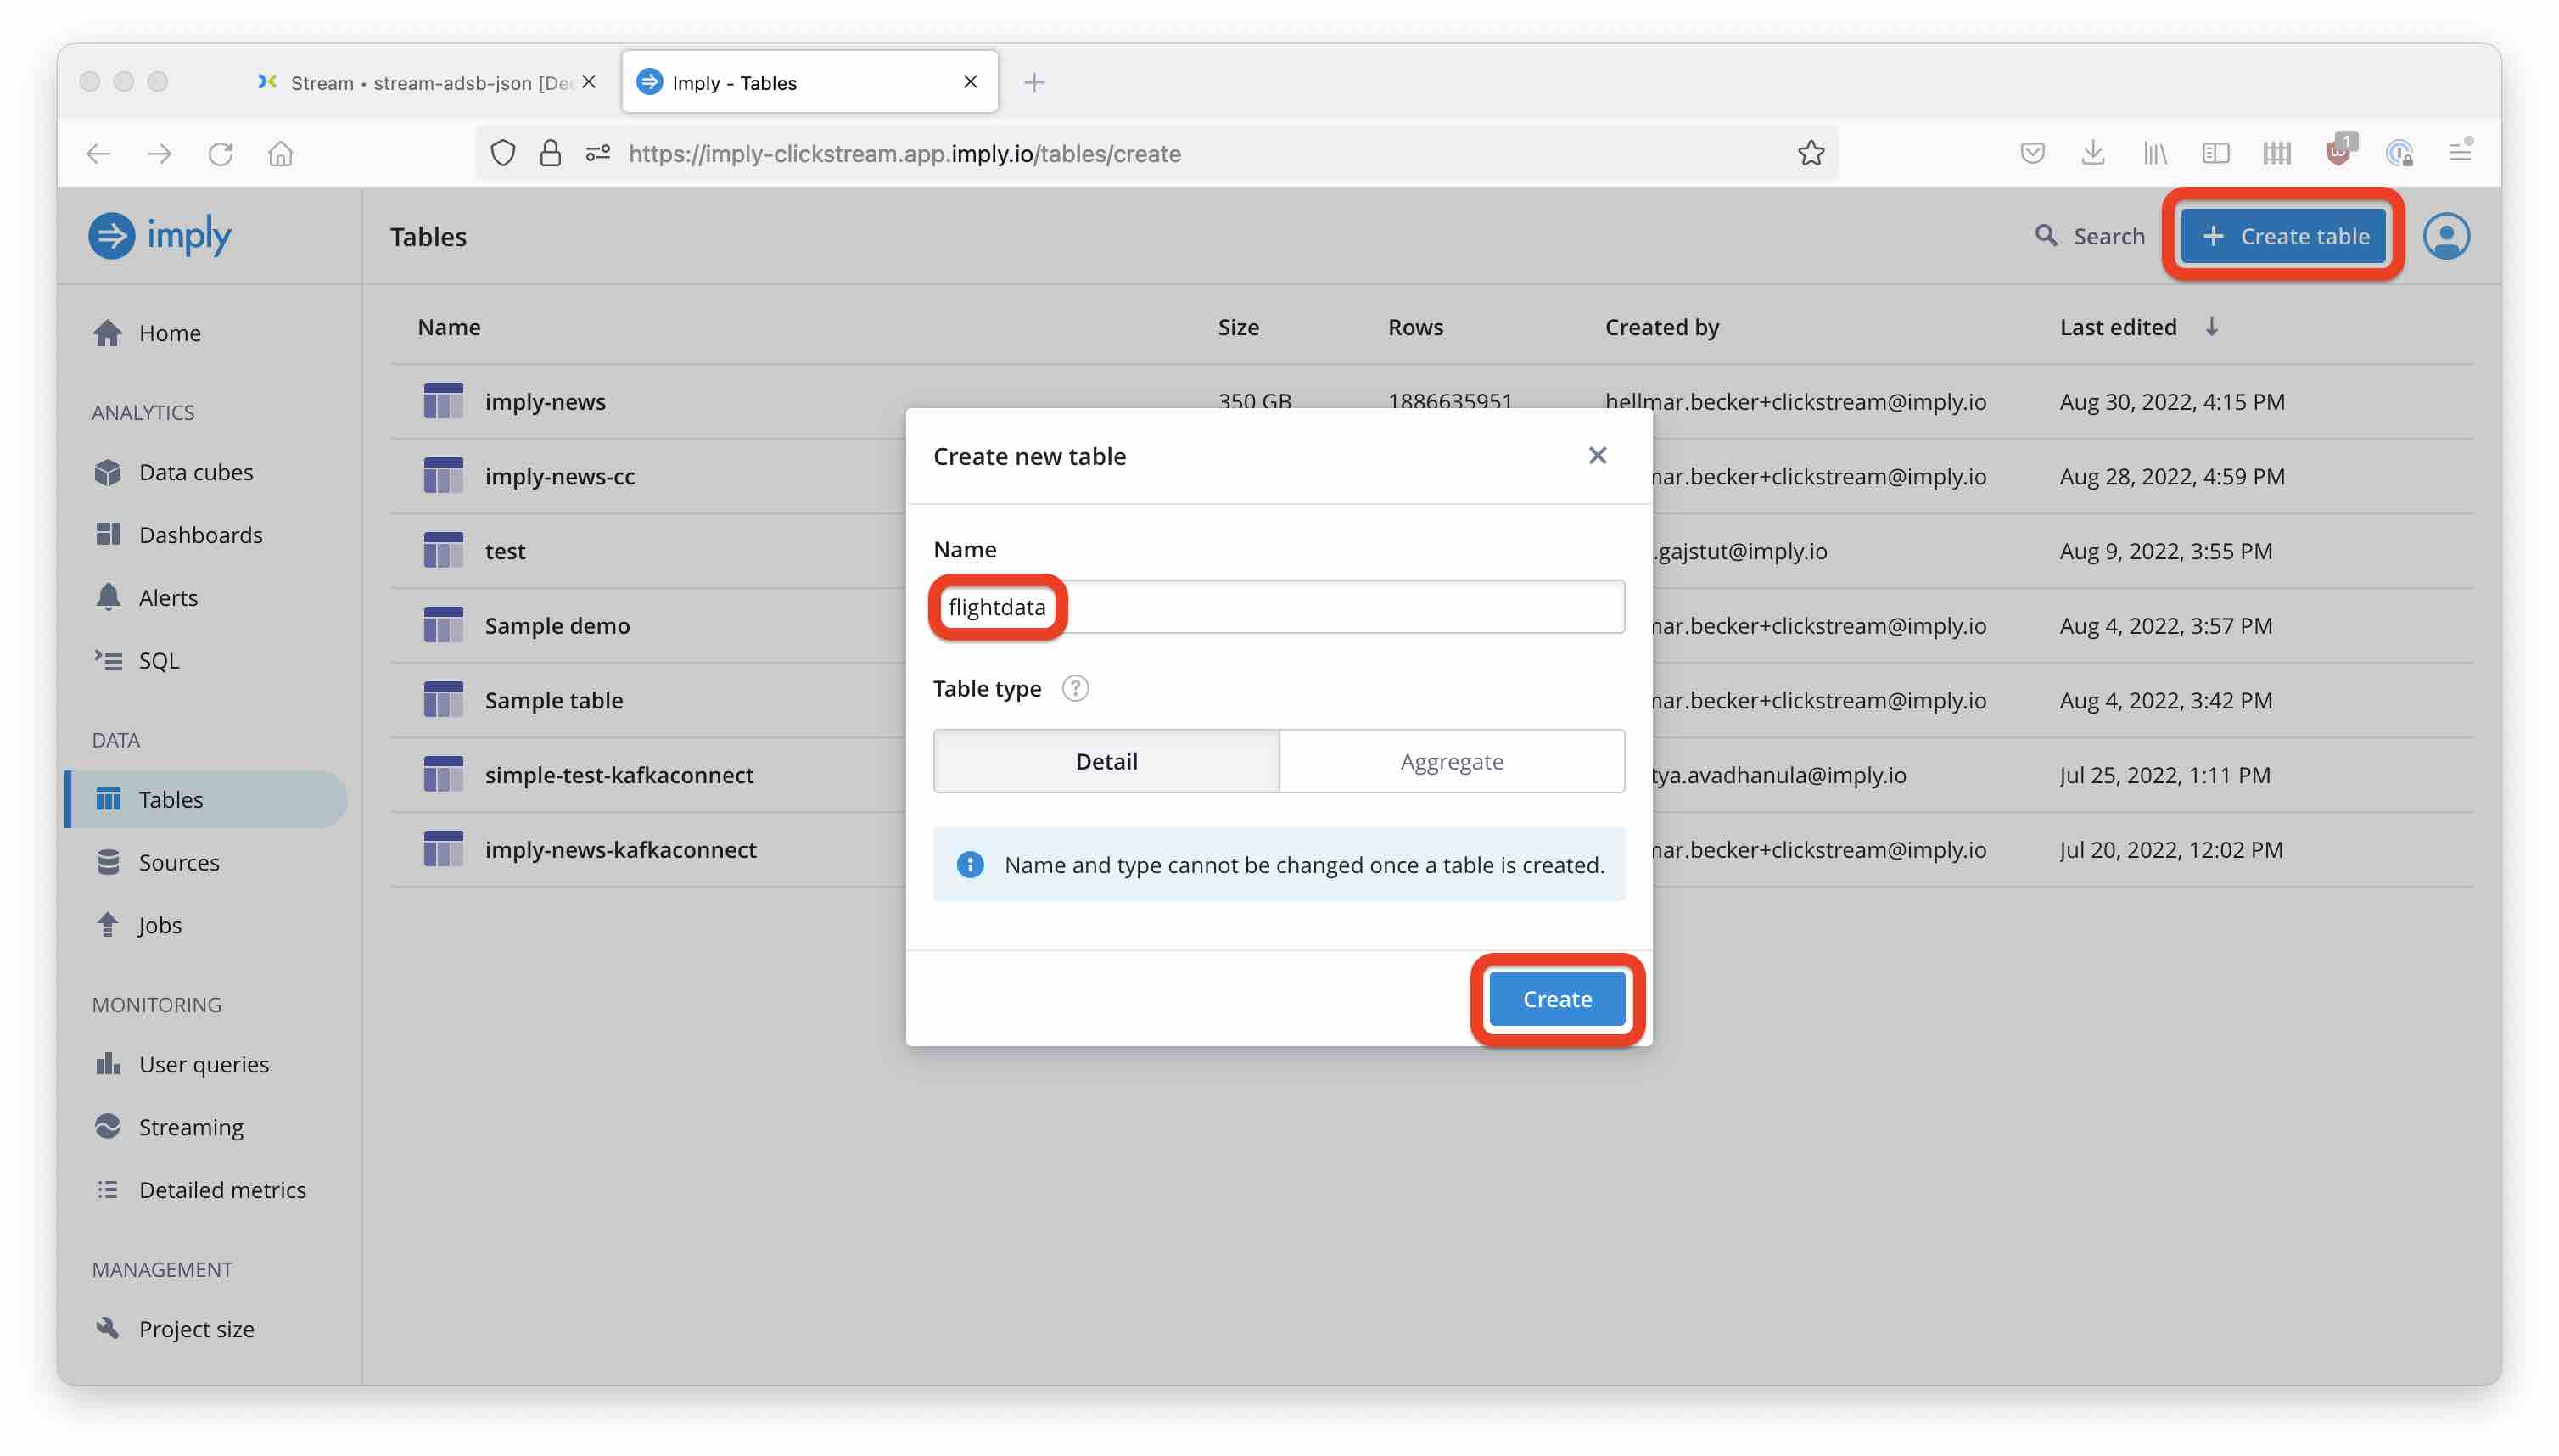
In the Tables menu, start by creating a new table.
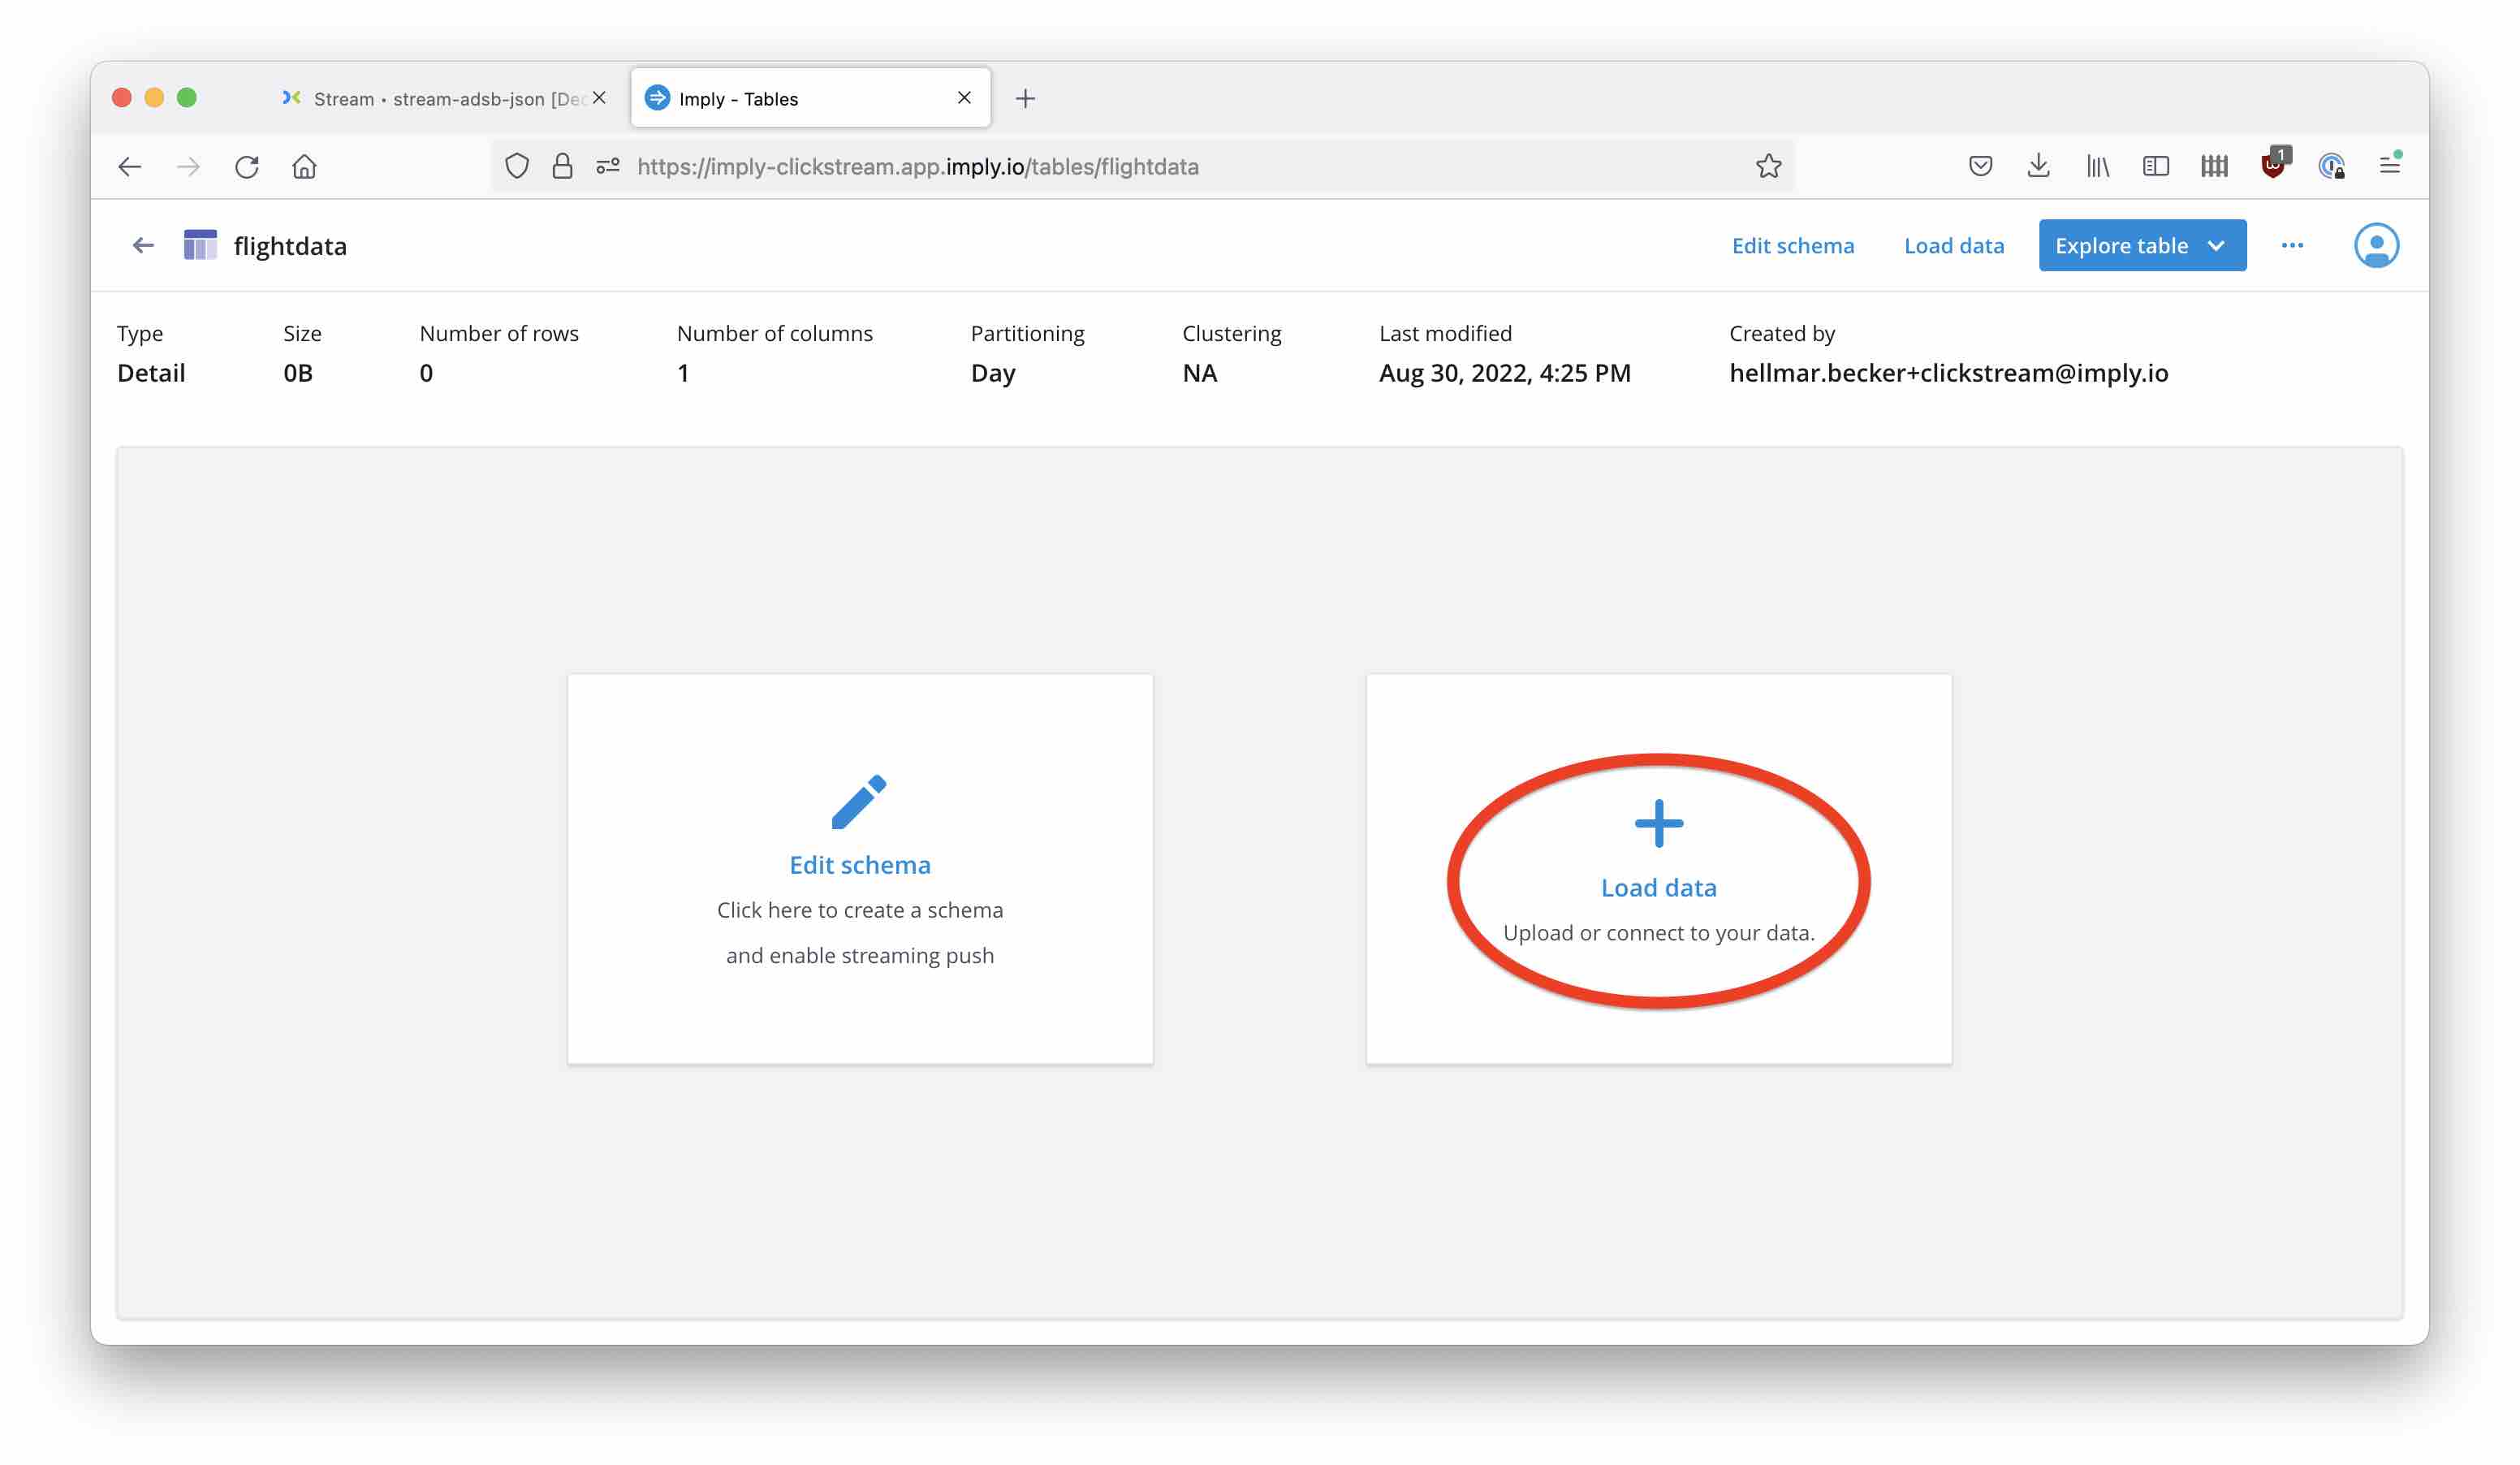
Because our data is structured as JSON, we can proceed directly to load data:
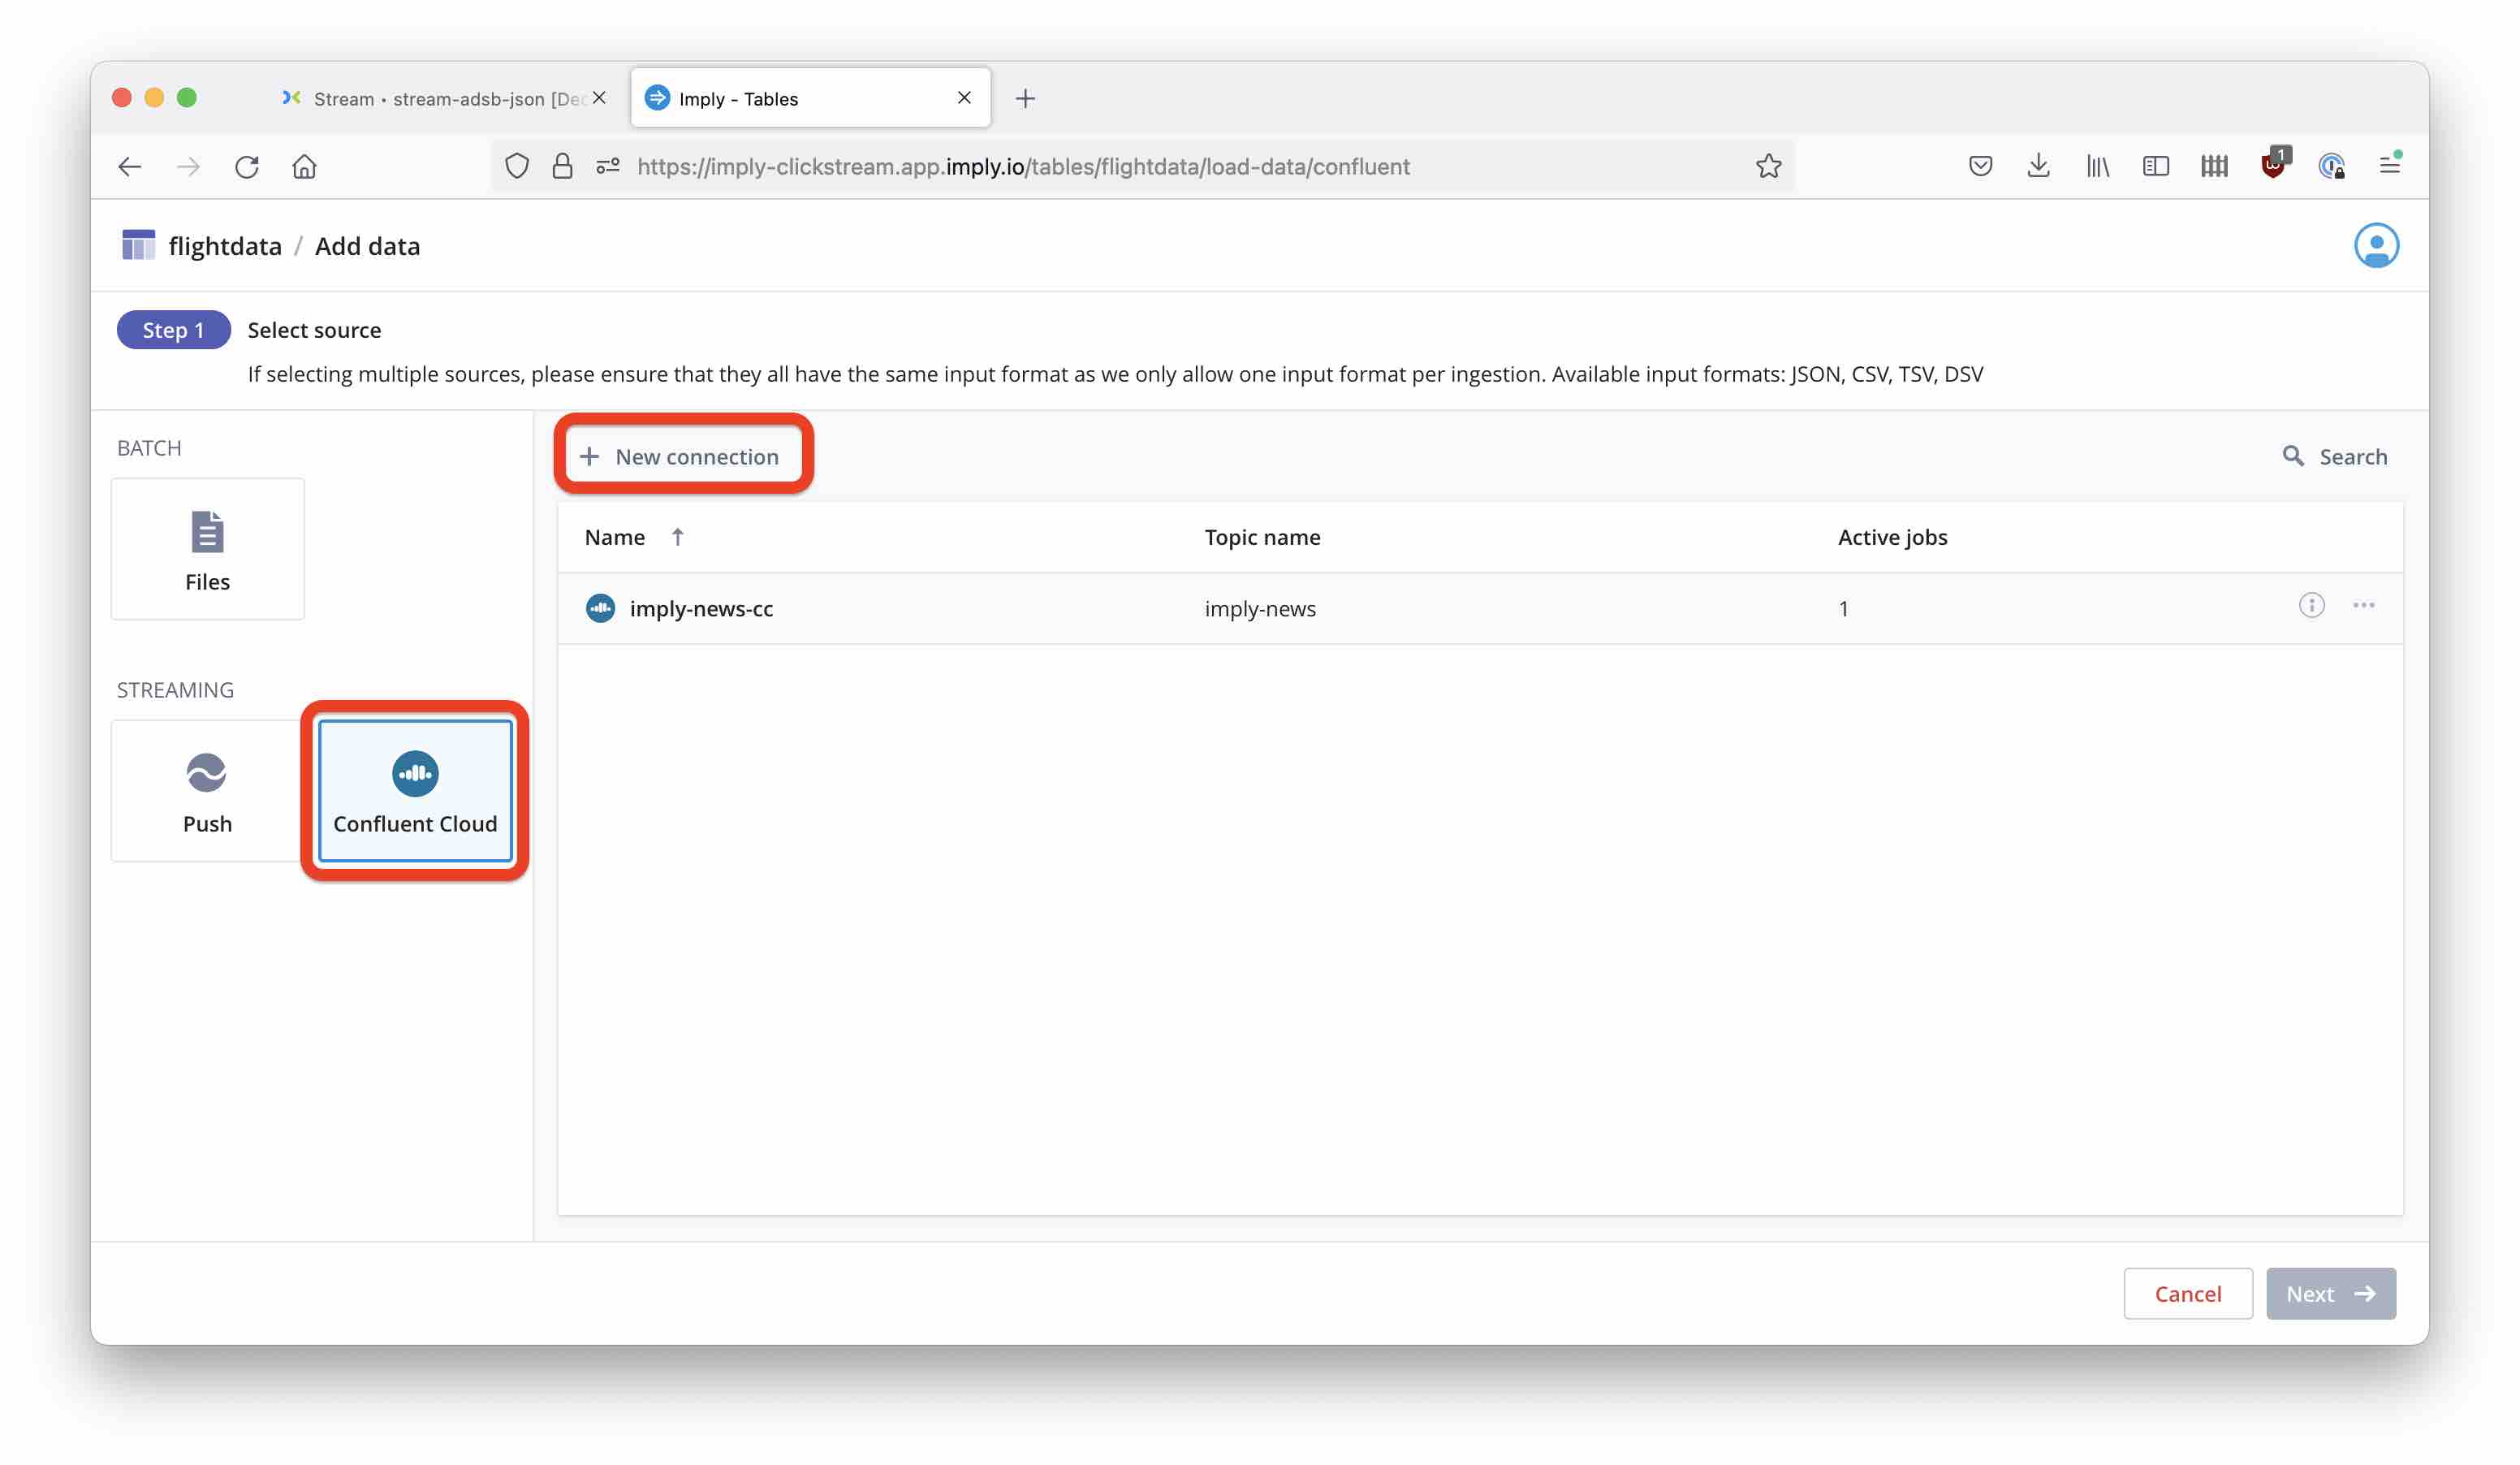
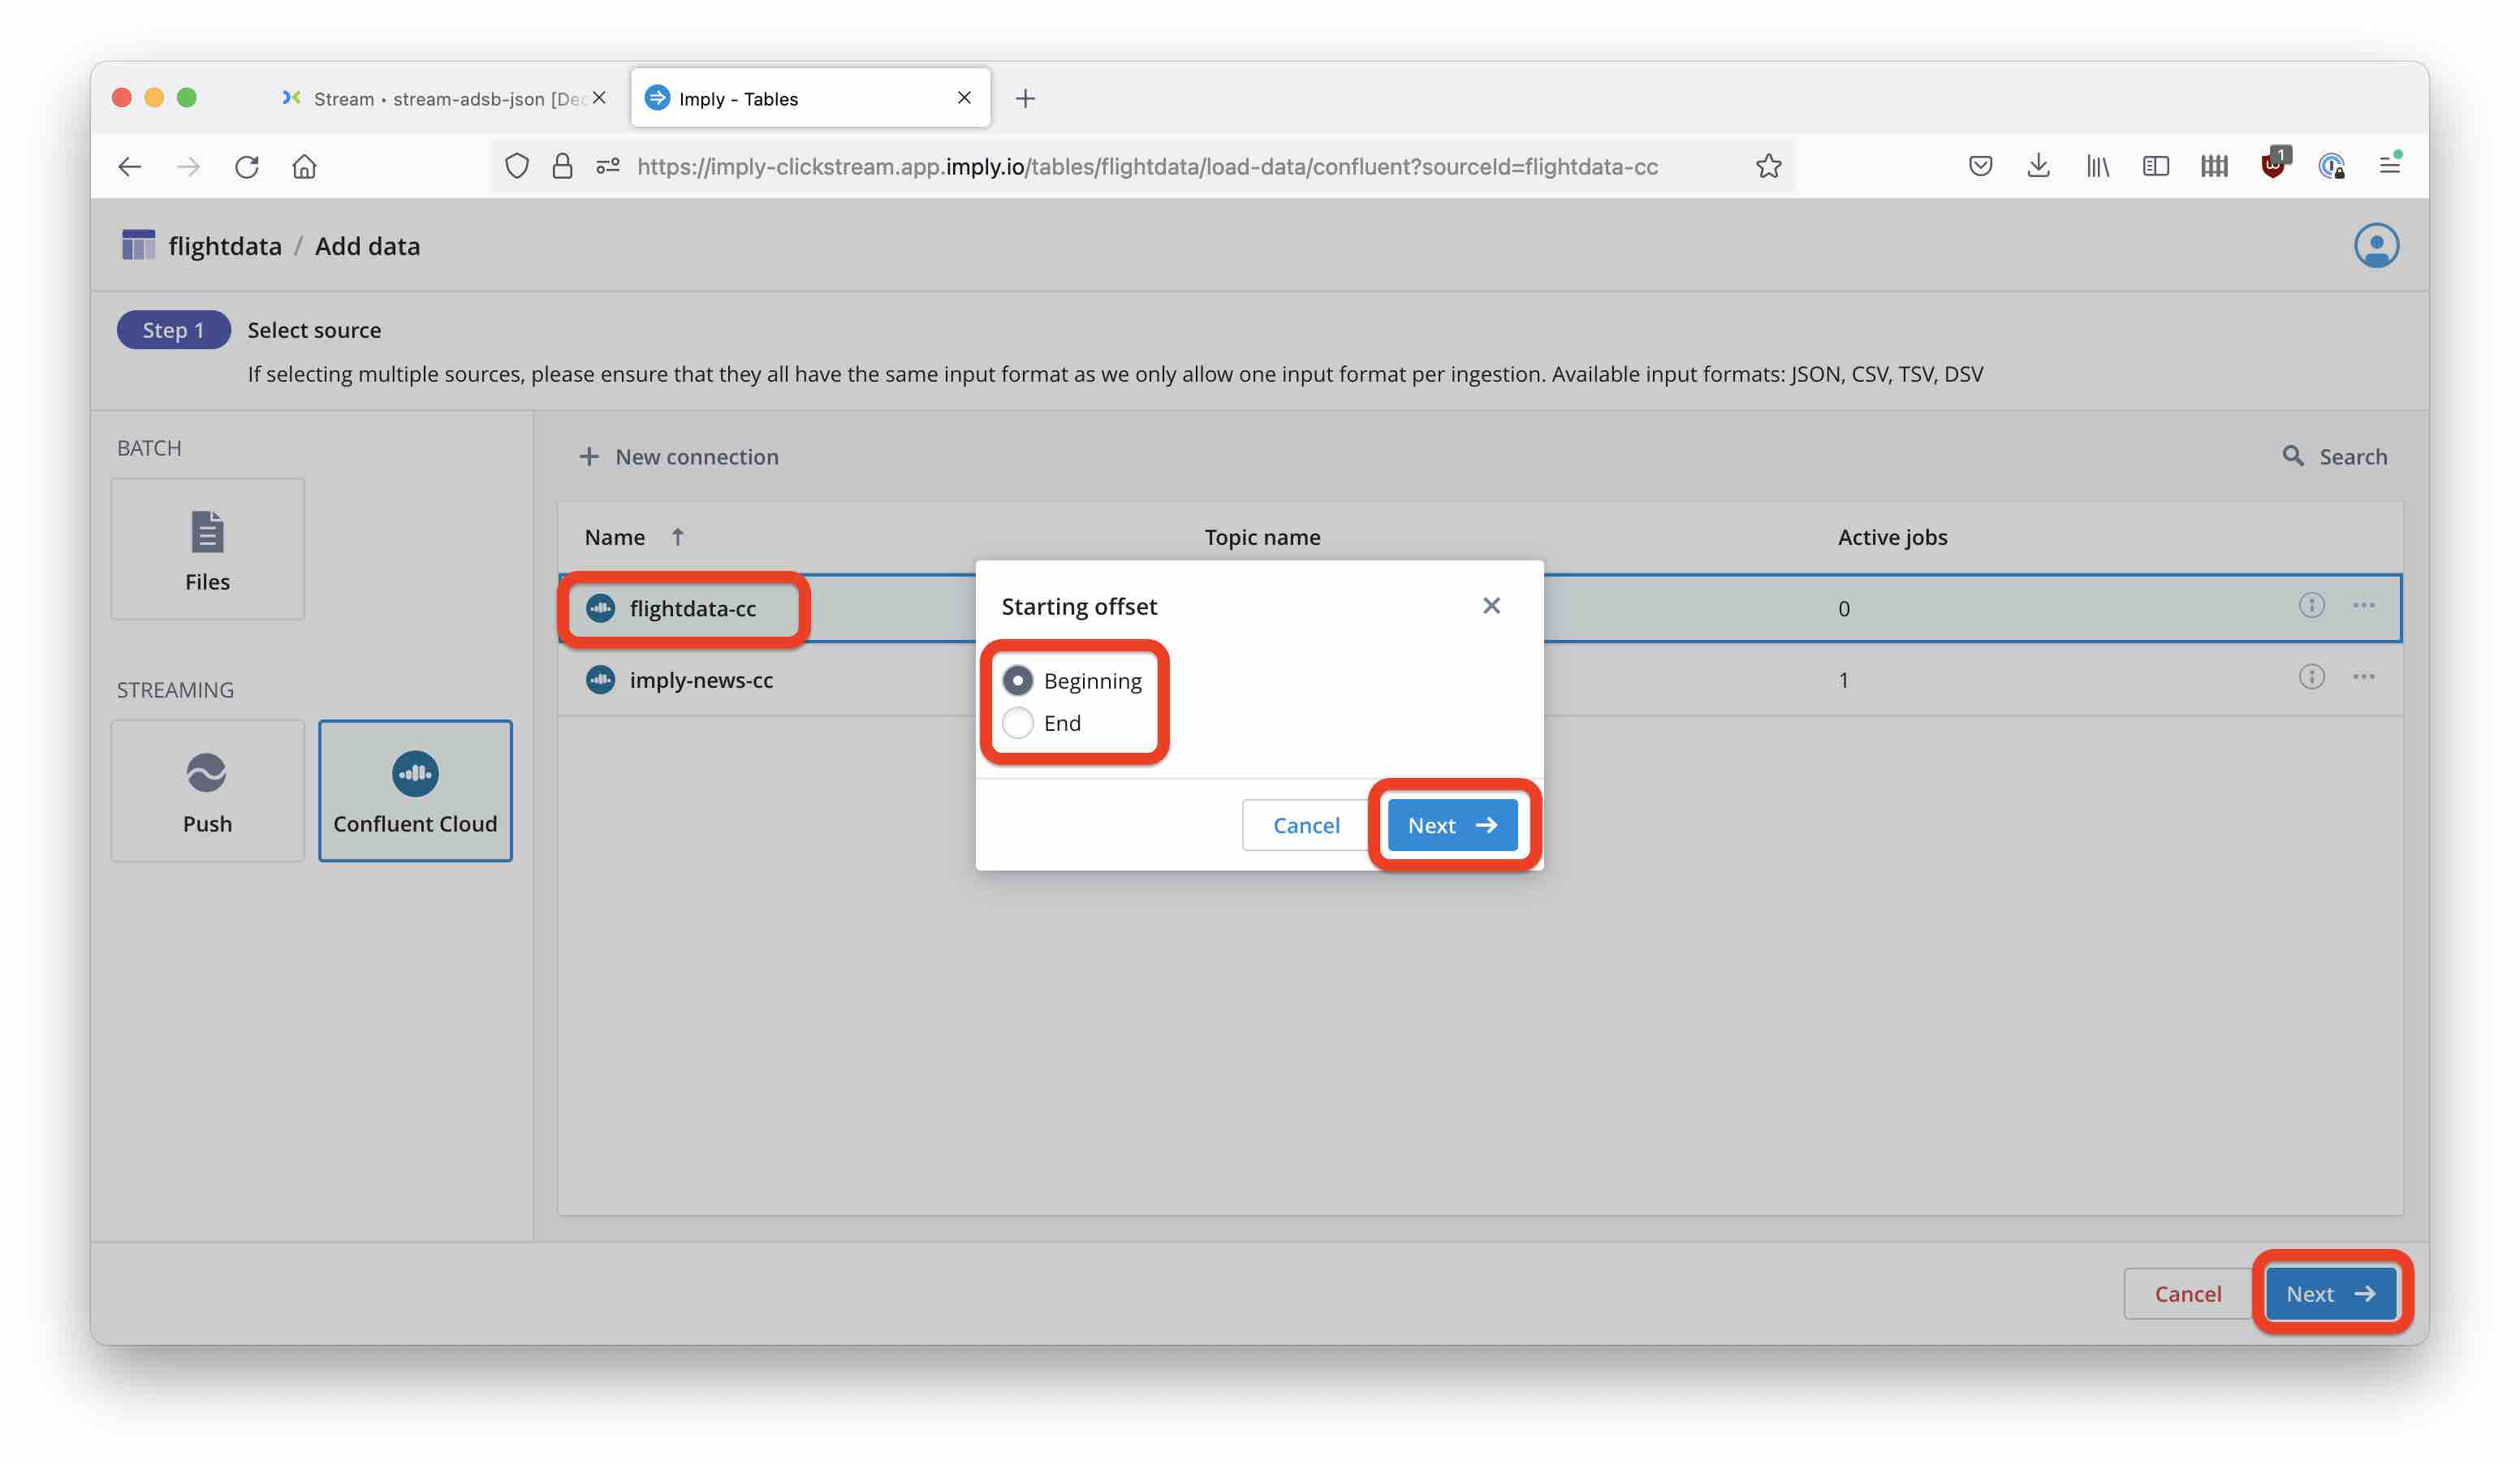
Now, it’s time to create a new Confluent Cloud connection. Select Confluent Cloud as the data source. We could also use the Push API here, this is an integration that Decodable may offer in the future.
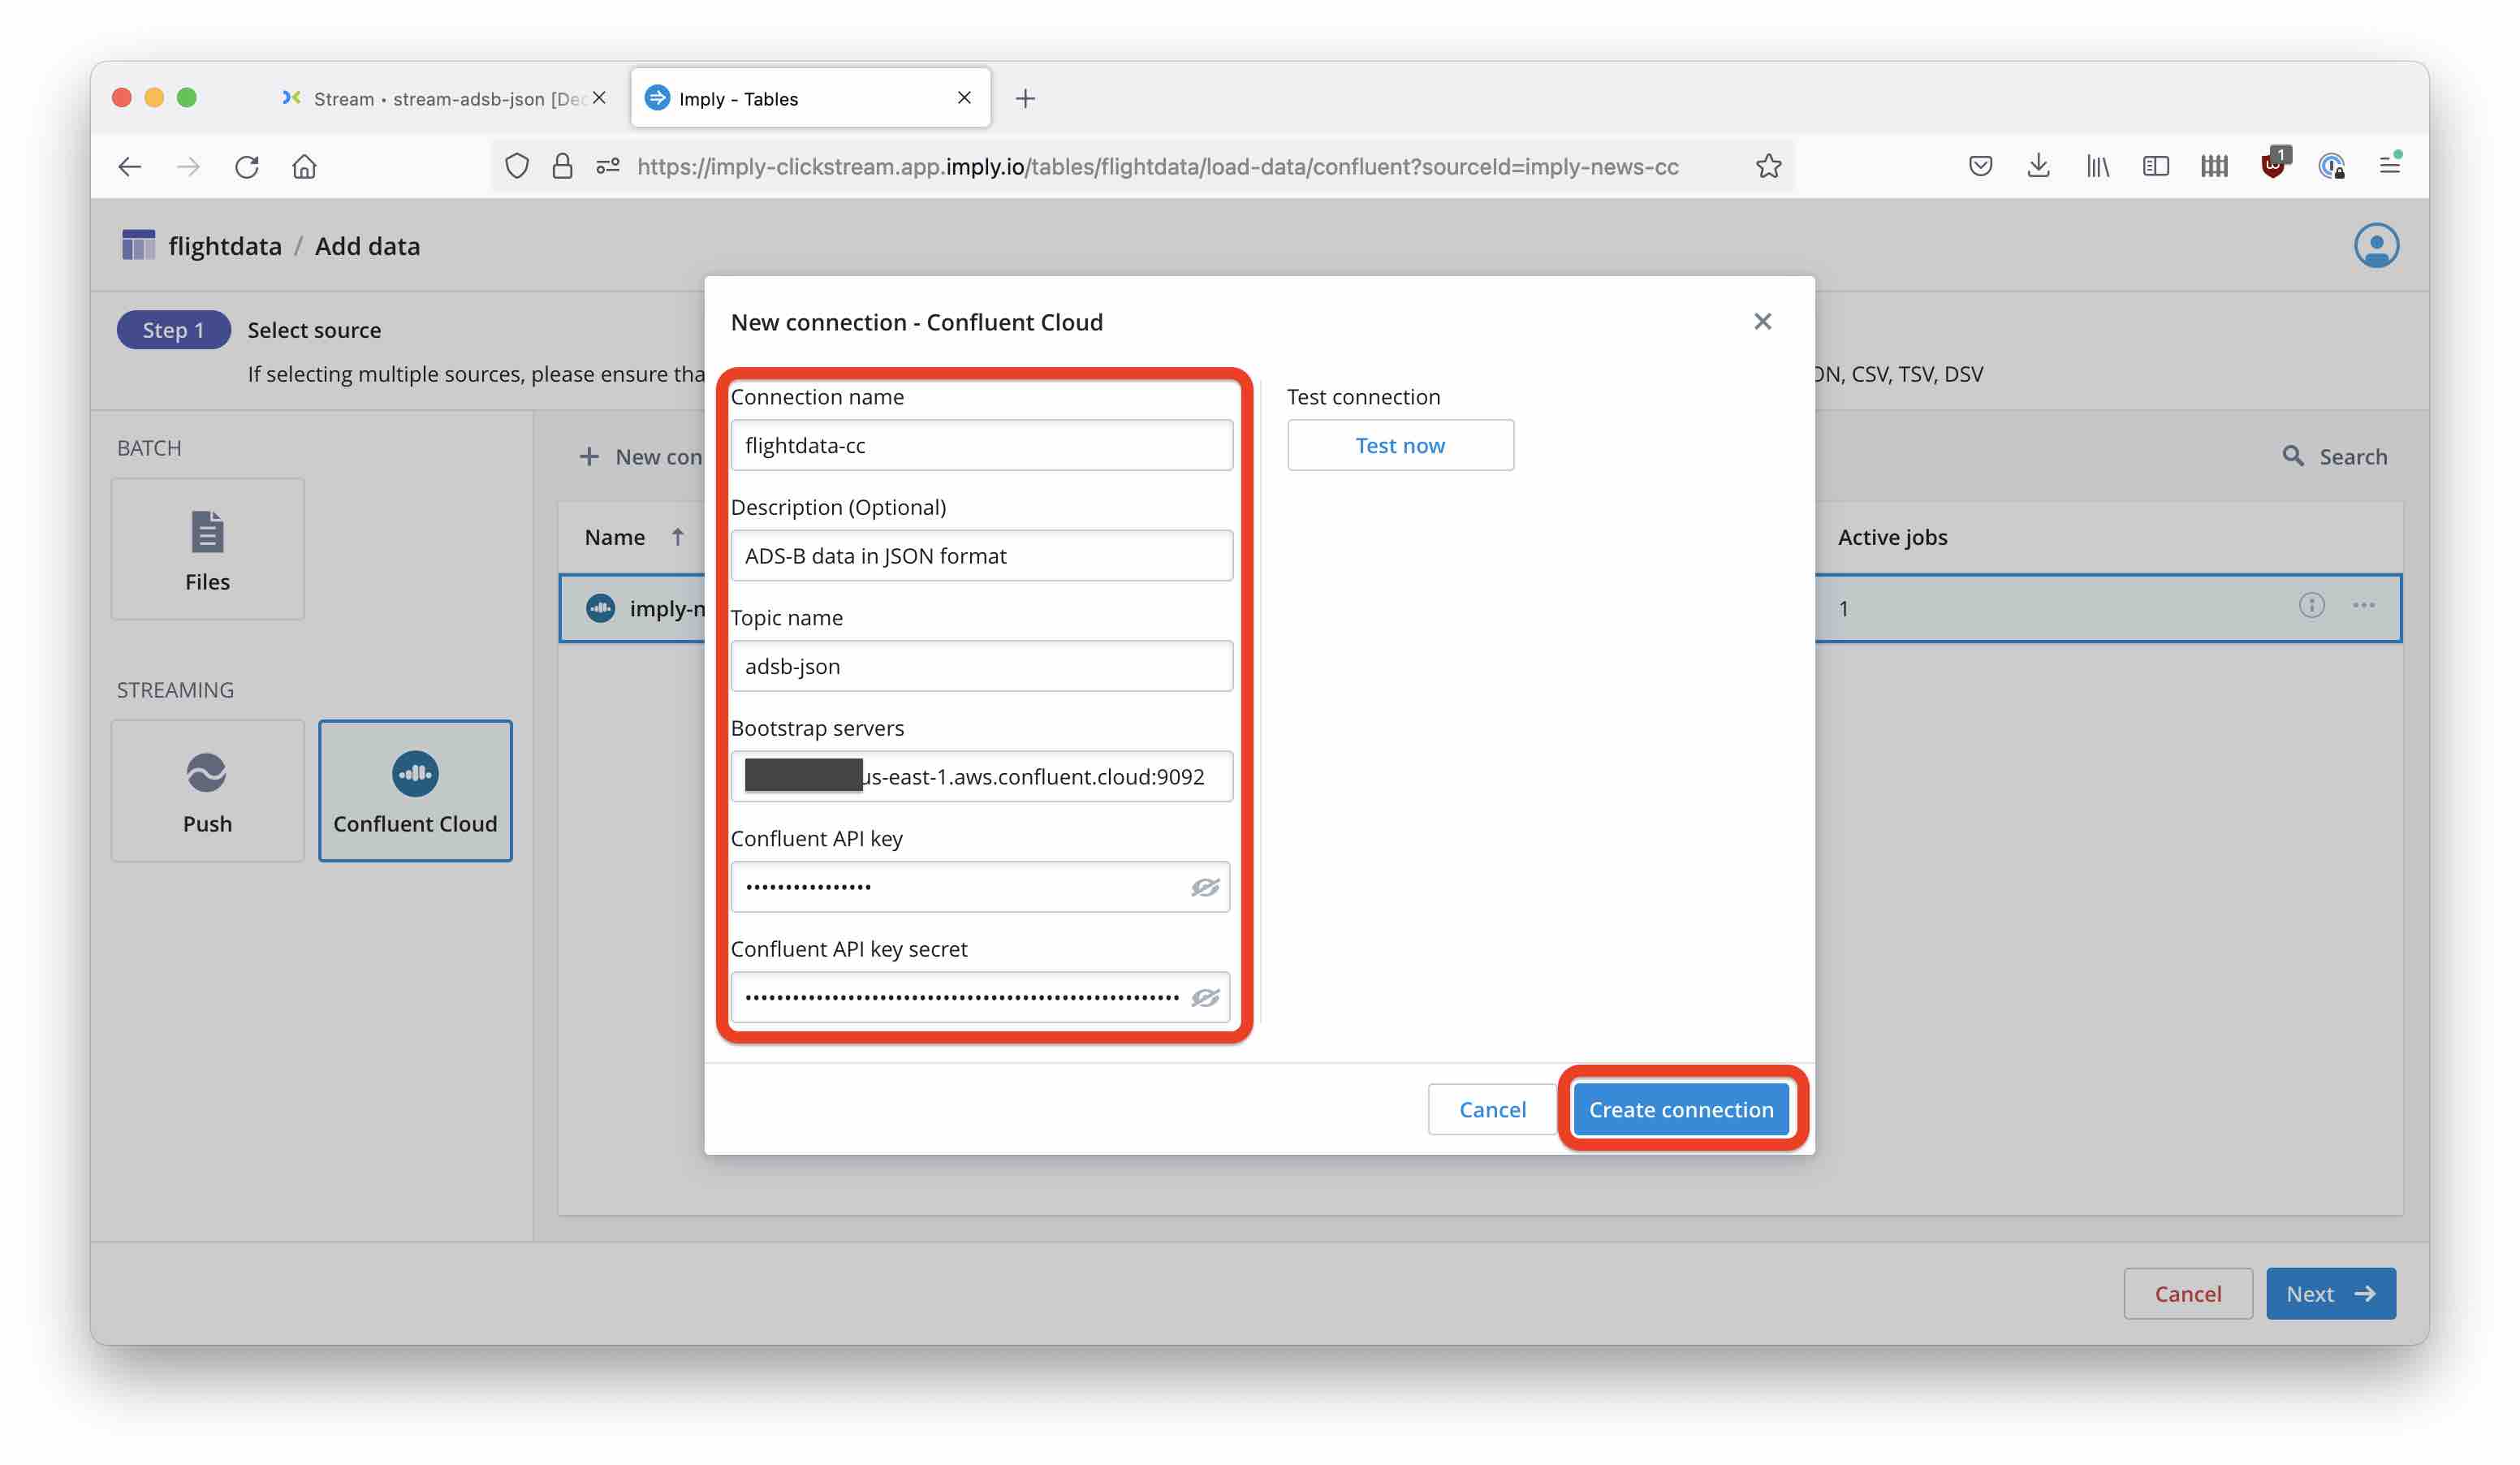
Enter the connection details such as topic name, bootstrap server address and API key and secret:
Finally, choose to ingest from the beginning of the topic.
Click through the next few screens - we are not going to make changes to the schema for now. After a short time, you can see data coming in!
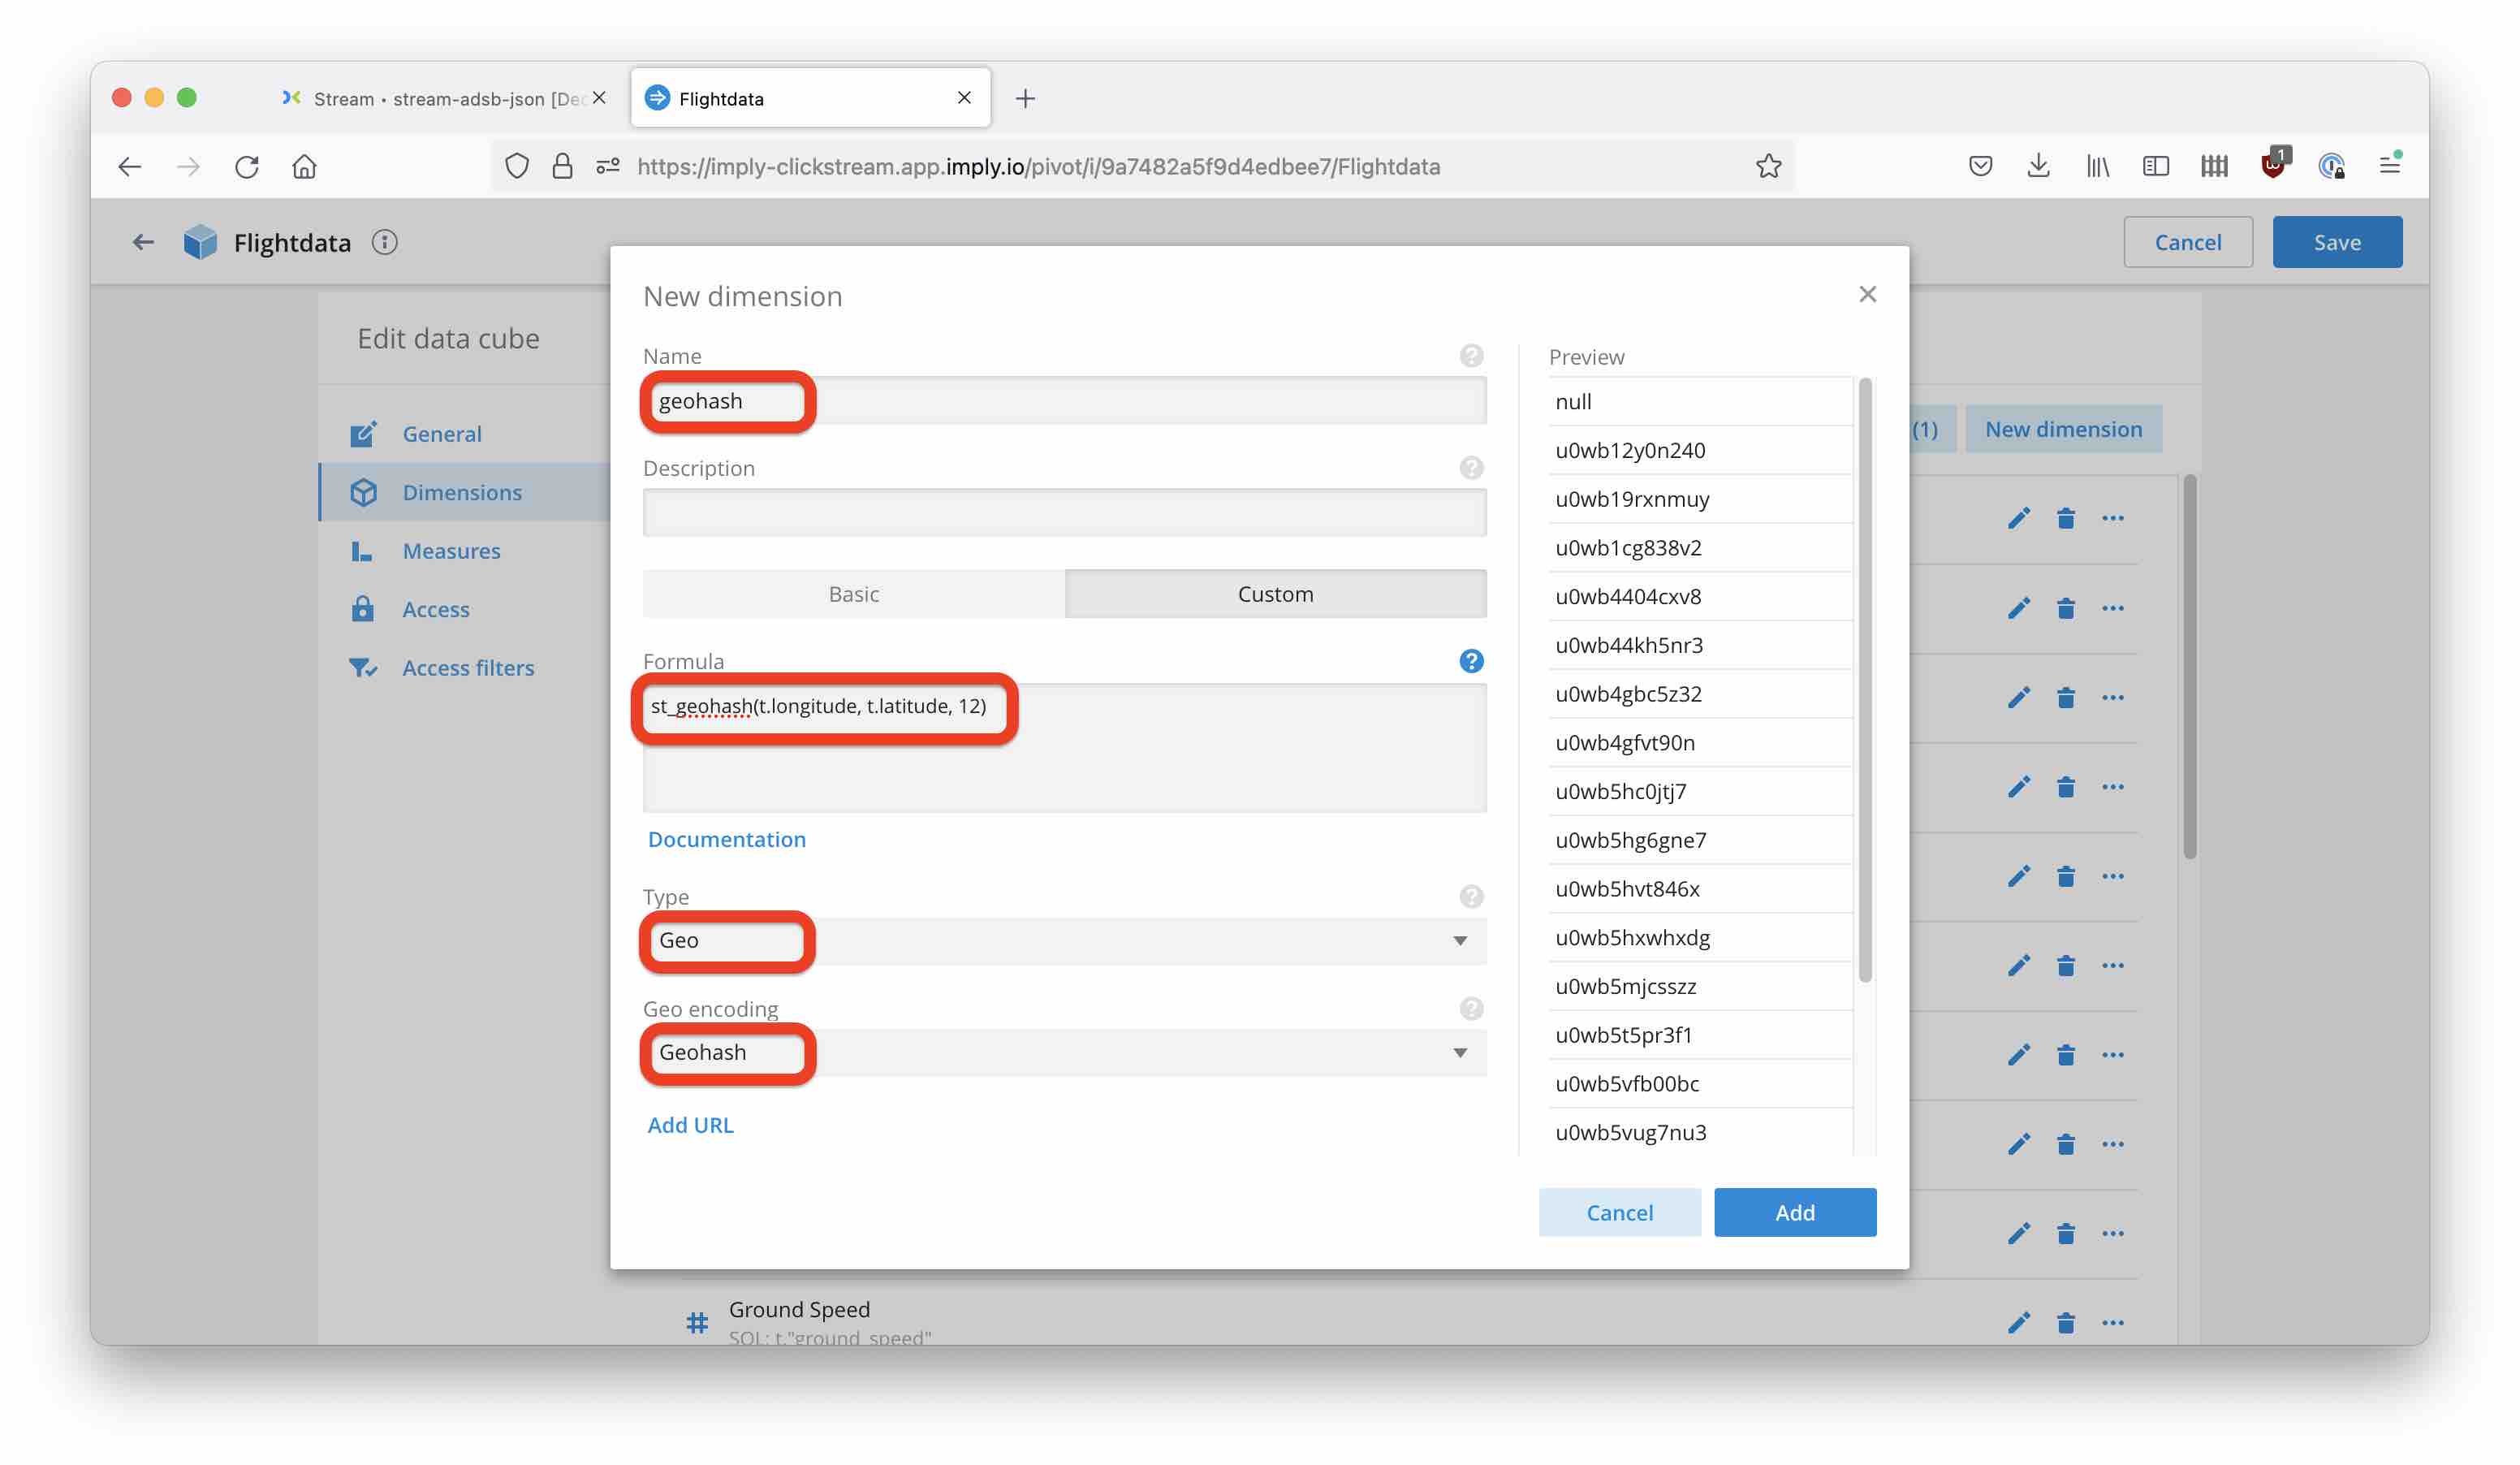
You can create a data cube to visualize the data coming in. Let’s also add a geohash dimension, computed from longitude and latitude:
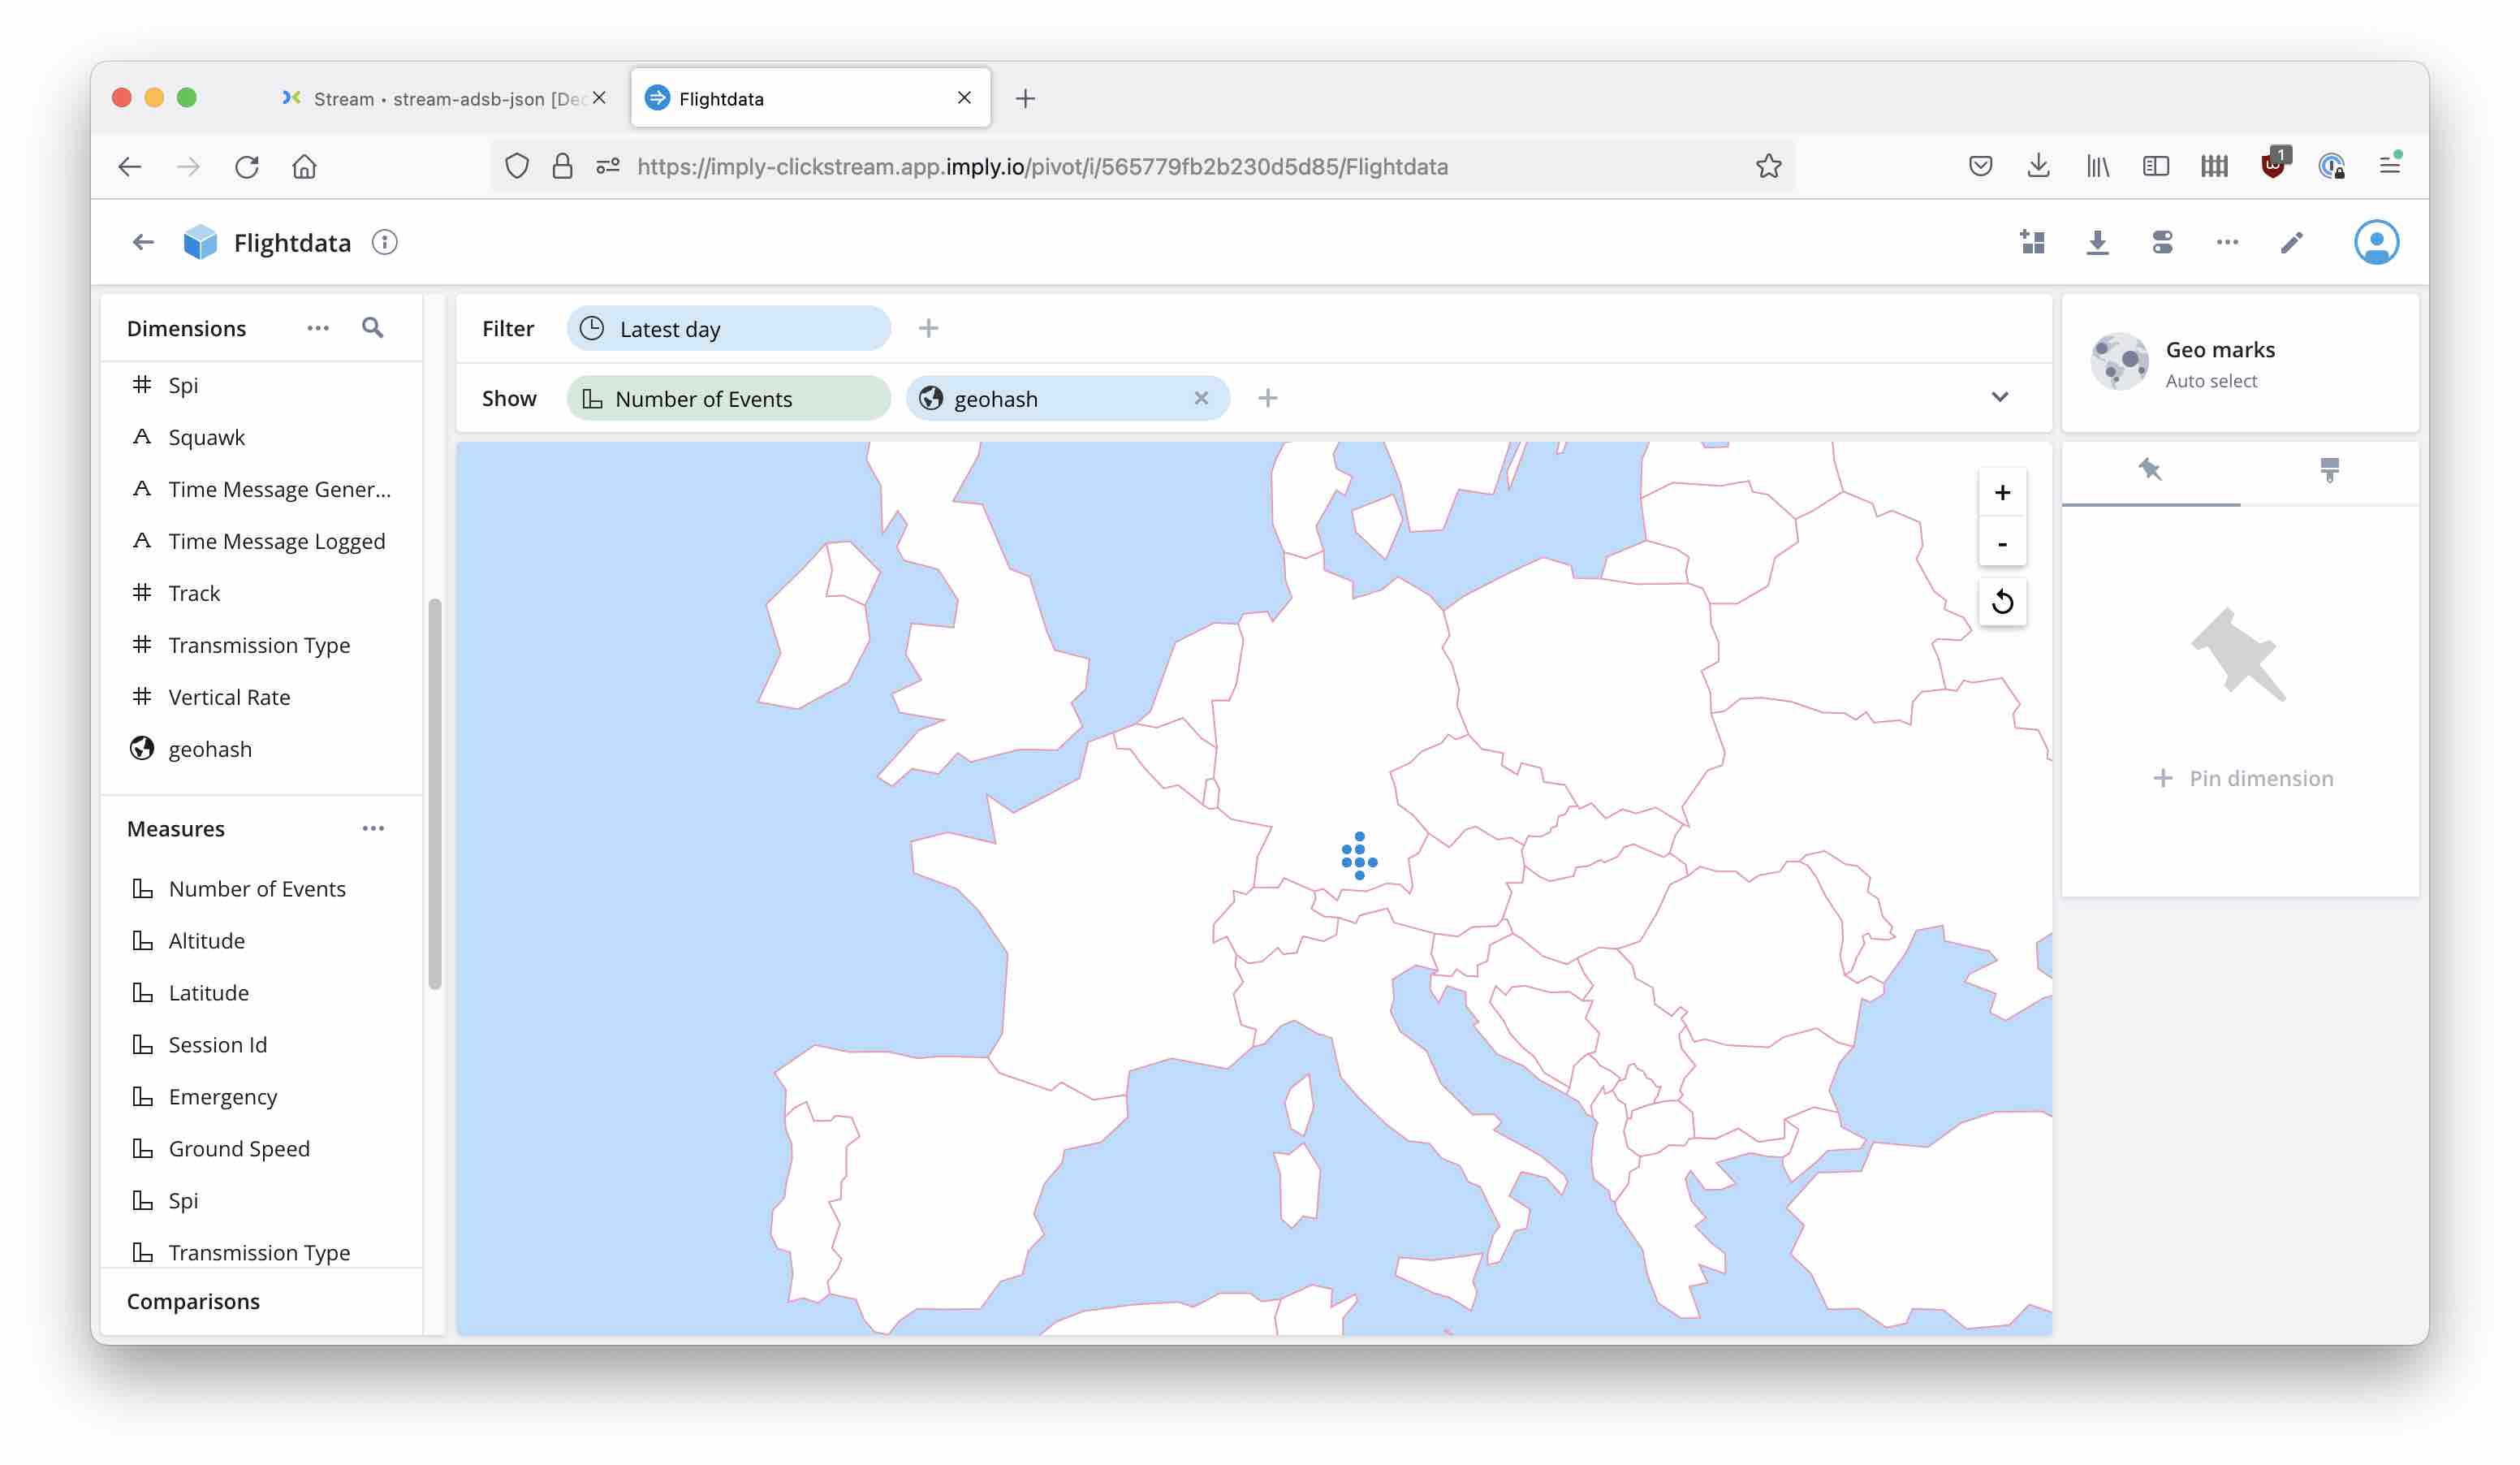
And so we can finally get the data on a map:
Learnings
- Imply Polaris now offers pull based stream ingestion from Confluent Cloud.
- Decodable is a no code, SQL only, streaming ETL service that is easy to connect to Imply Polaris via Confluent Cloud.
- With these tools, it is easy to stream almost any type of event data into Polaris.